Tiger Bridge + GDX Cloud Integration
Setup for Data Replication and Backup to GDX Cloud
This guide walks you through setting up Tiger Bridge to automatically replicate and back up your data to GDX Cloud. Tiger Bridge provides enterprise-grade data protection with seamless cloud integration, allowing you to maintain a secure copy of your critical files.
Prerequisites
- Tiger Bridge installed and running
- Local source data or folders ready for backup
- Admin access to Tiger Bridge Configuration
- GDX Cloud credentials ready (see GDX Cloud Setup for account and access key setup)
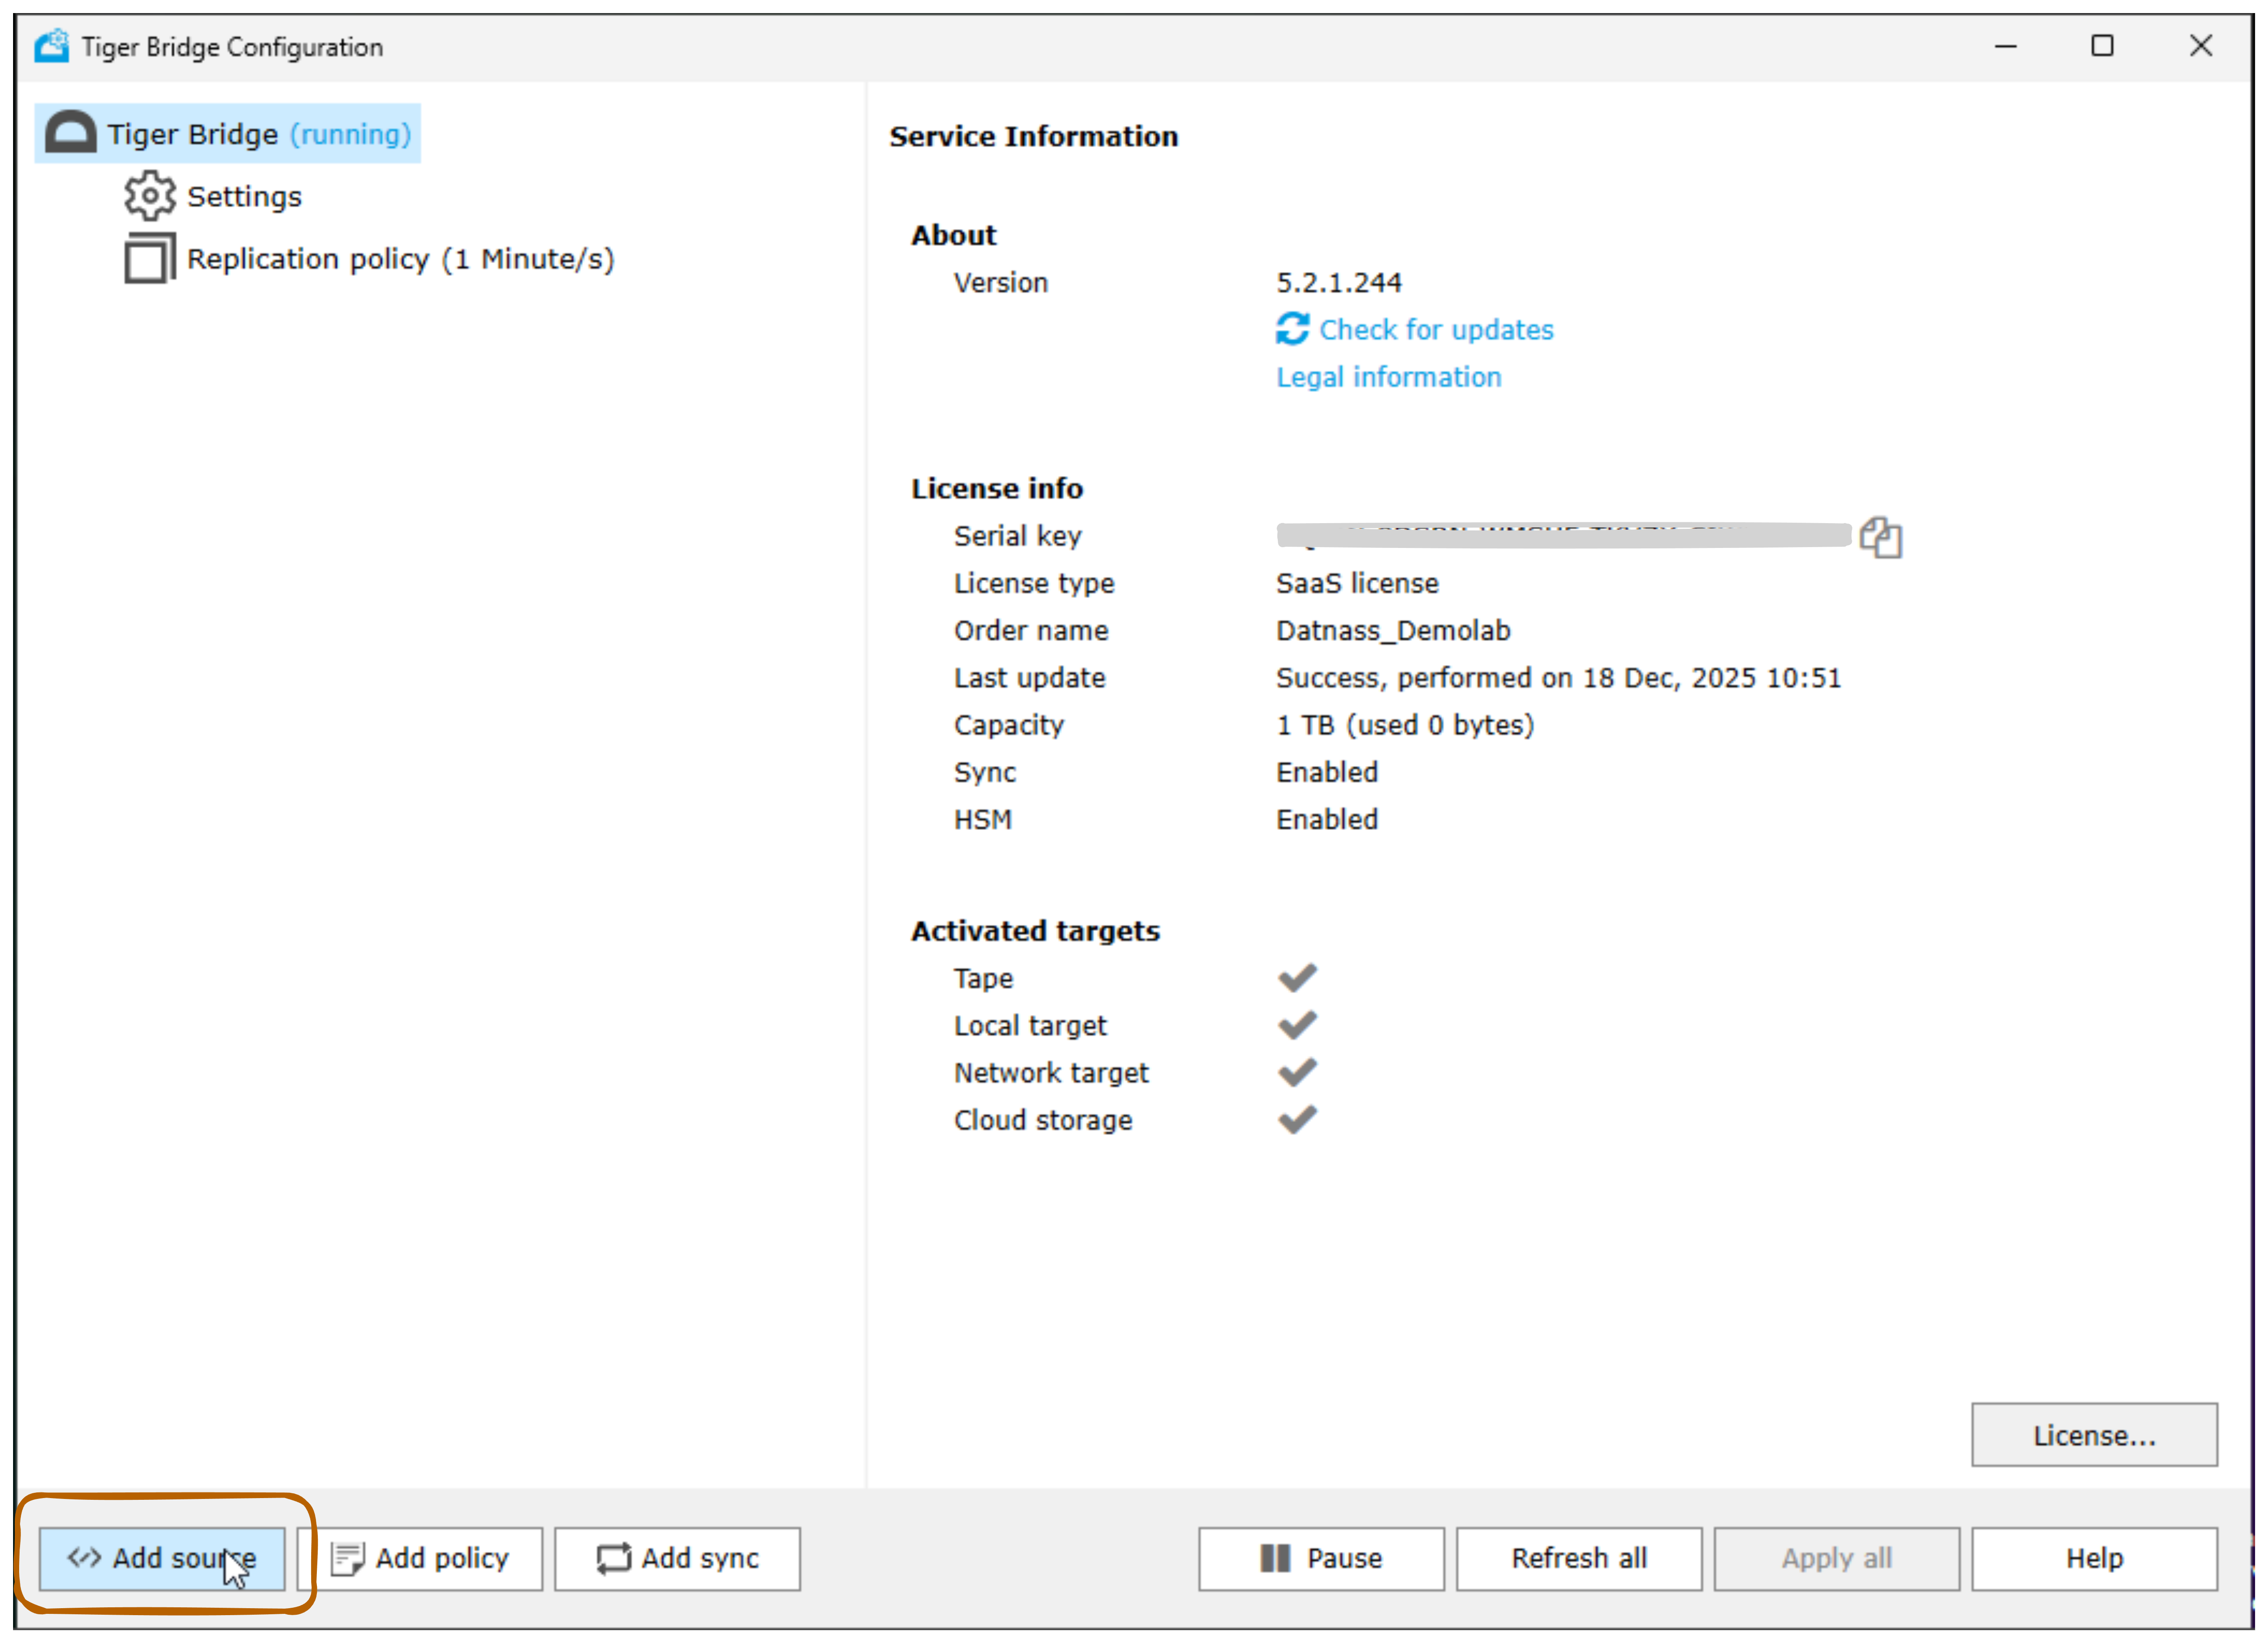
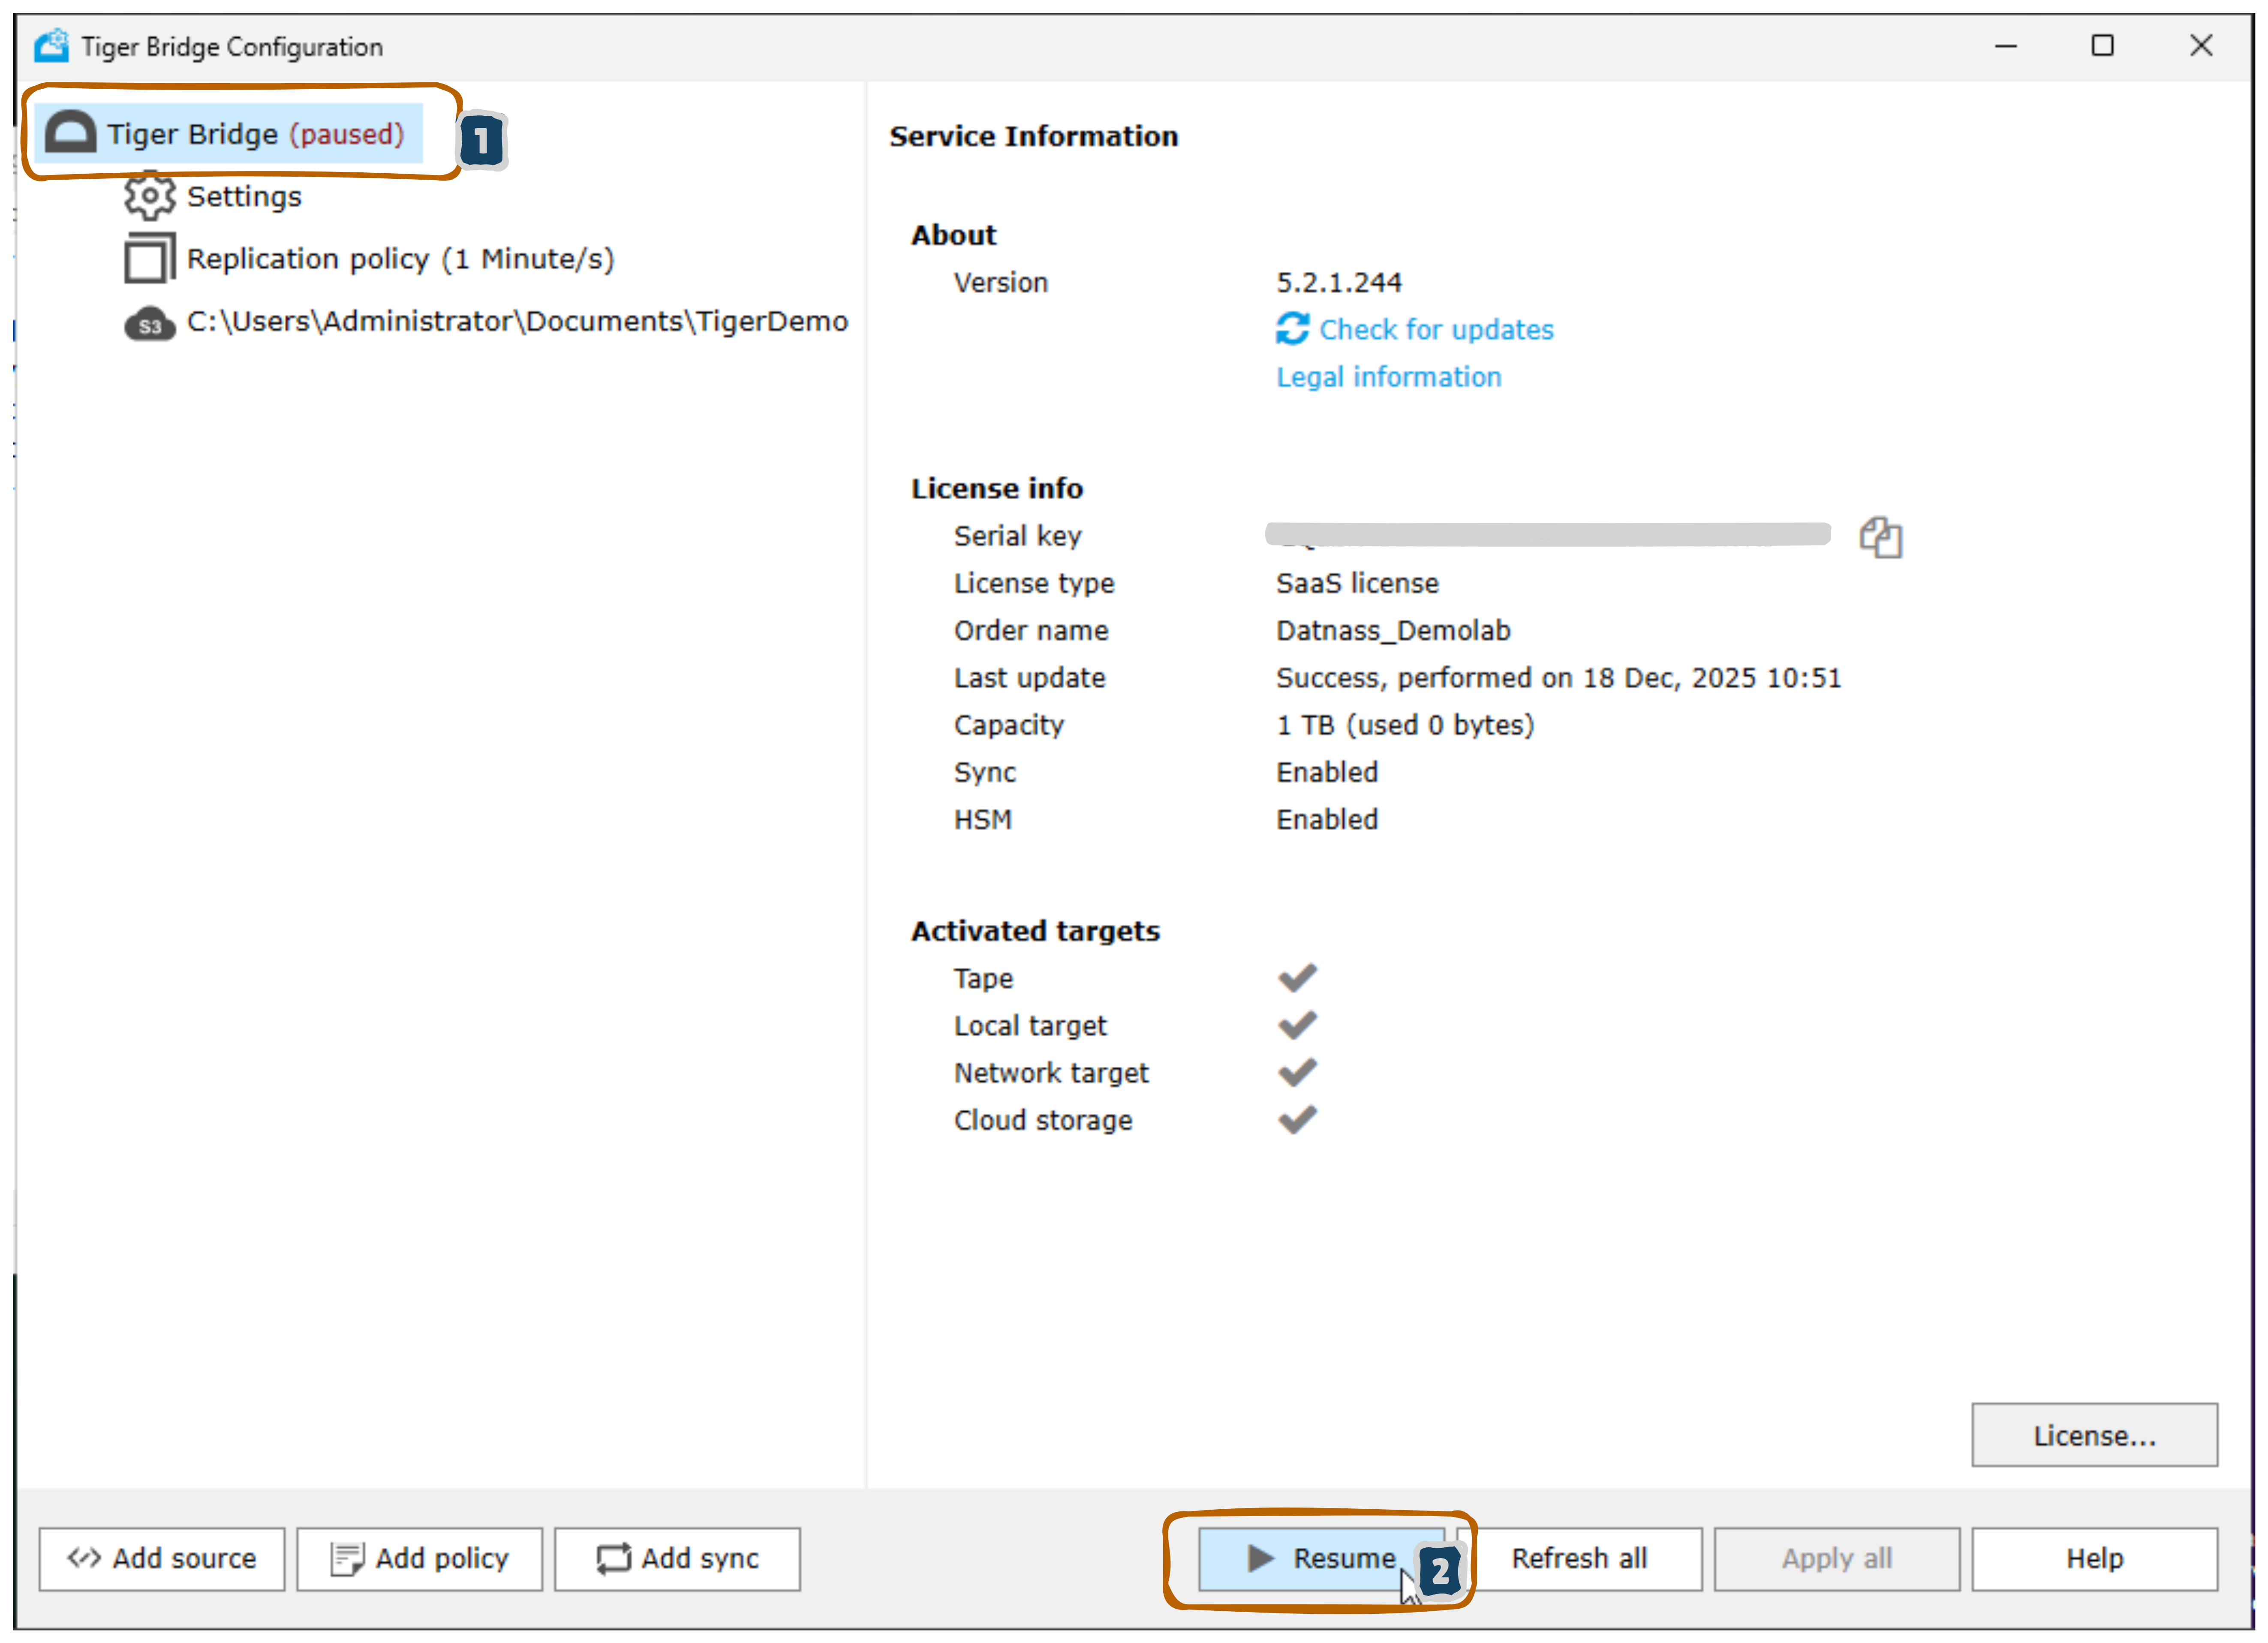
Step 1: Open Tiger Bridge Configuration
Launch the Tiger Bridge application
The main window displays:
- Tiger Bridge (running) status
- Settings menu
- Replication policy (1 Minute/s)
- Service Information panel
- License Information panel
- Activated targets: Tape, Local target, Network target, Cloud storage (all checked)
Click the Add source button to create a new replication source
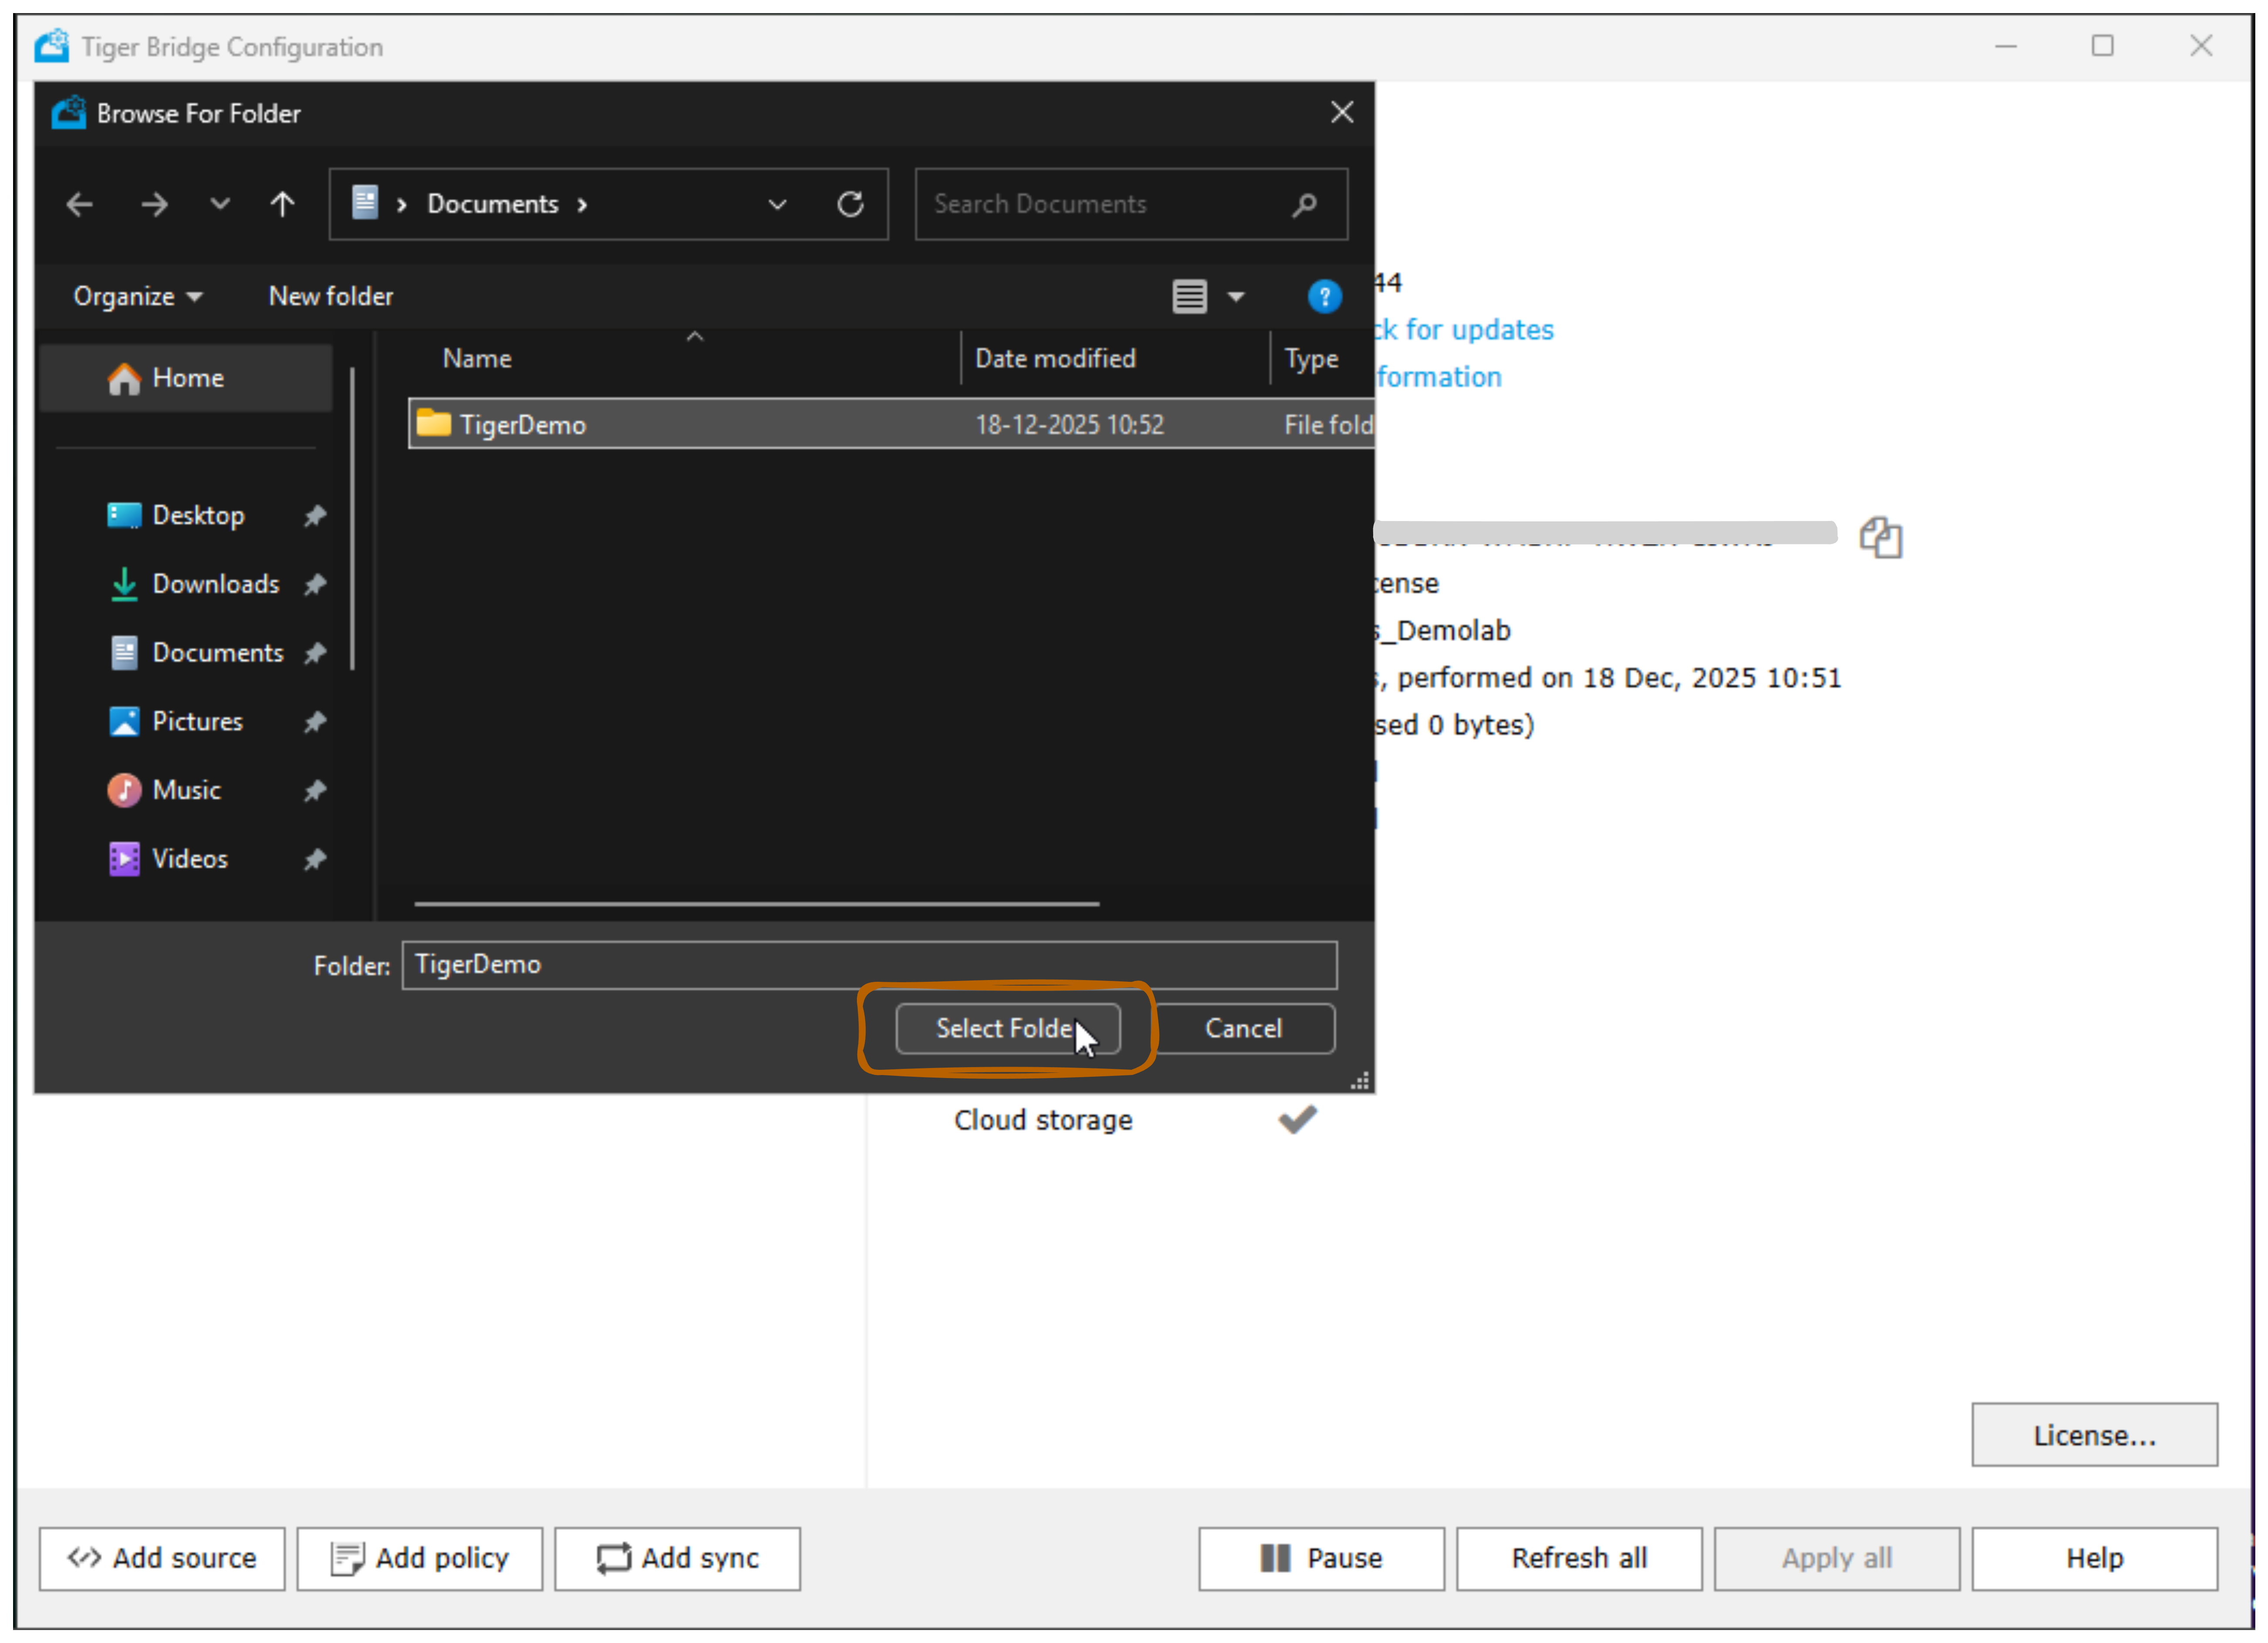
Step 2: Select Local Source Folder
- Click the Add source button
- A “Browse For Folder” dialog opens
- Select your source folder path:
- Navigate to your data location (e.g., C:\Users\Administrator\Documents\TigerDemo)
- The path shows:
C:\Users\Administrator\Documents\TigerDemo
- The folder appears in the left sidebar as a replication source
- Click Select Folder to confirm
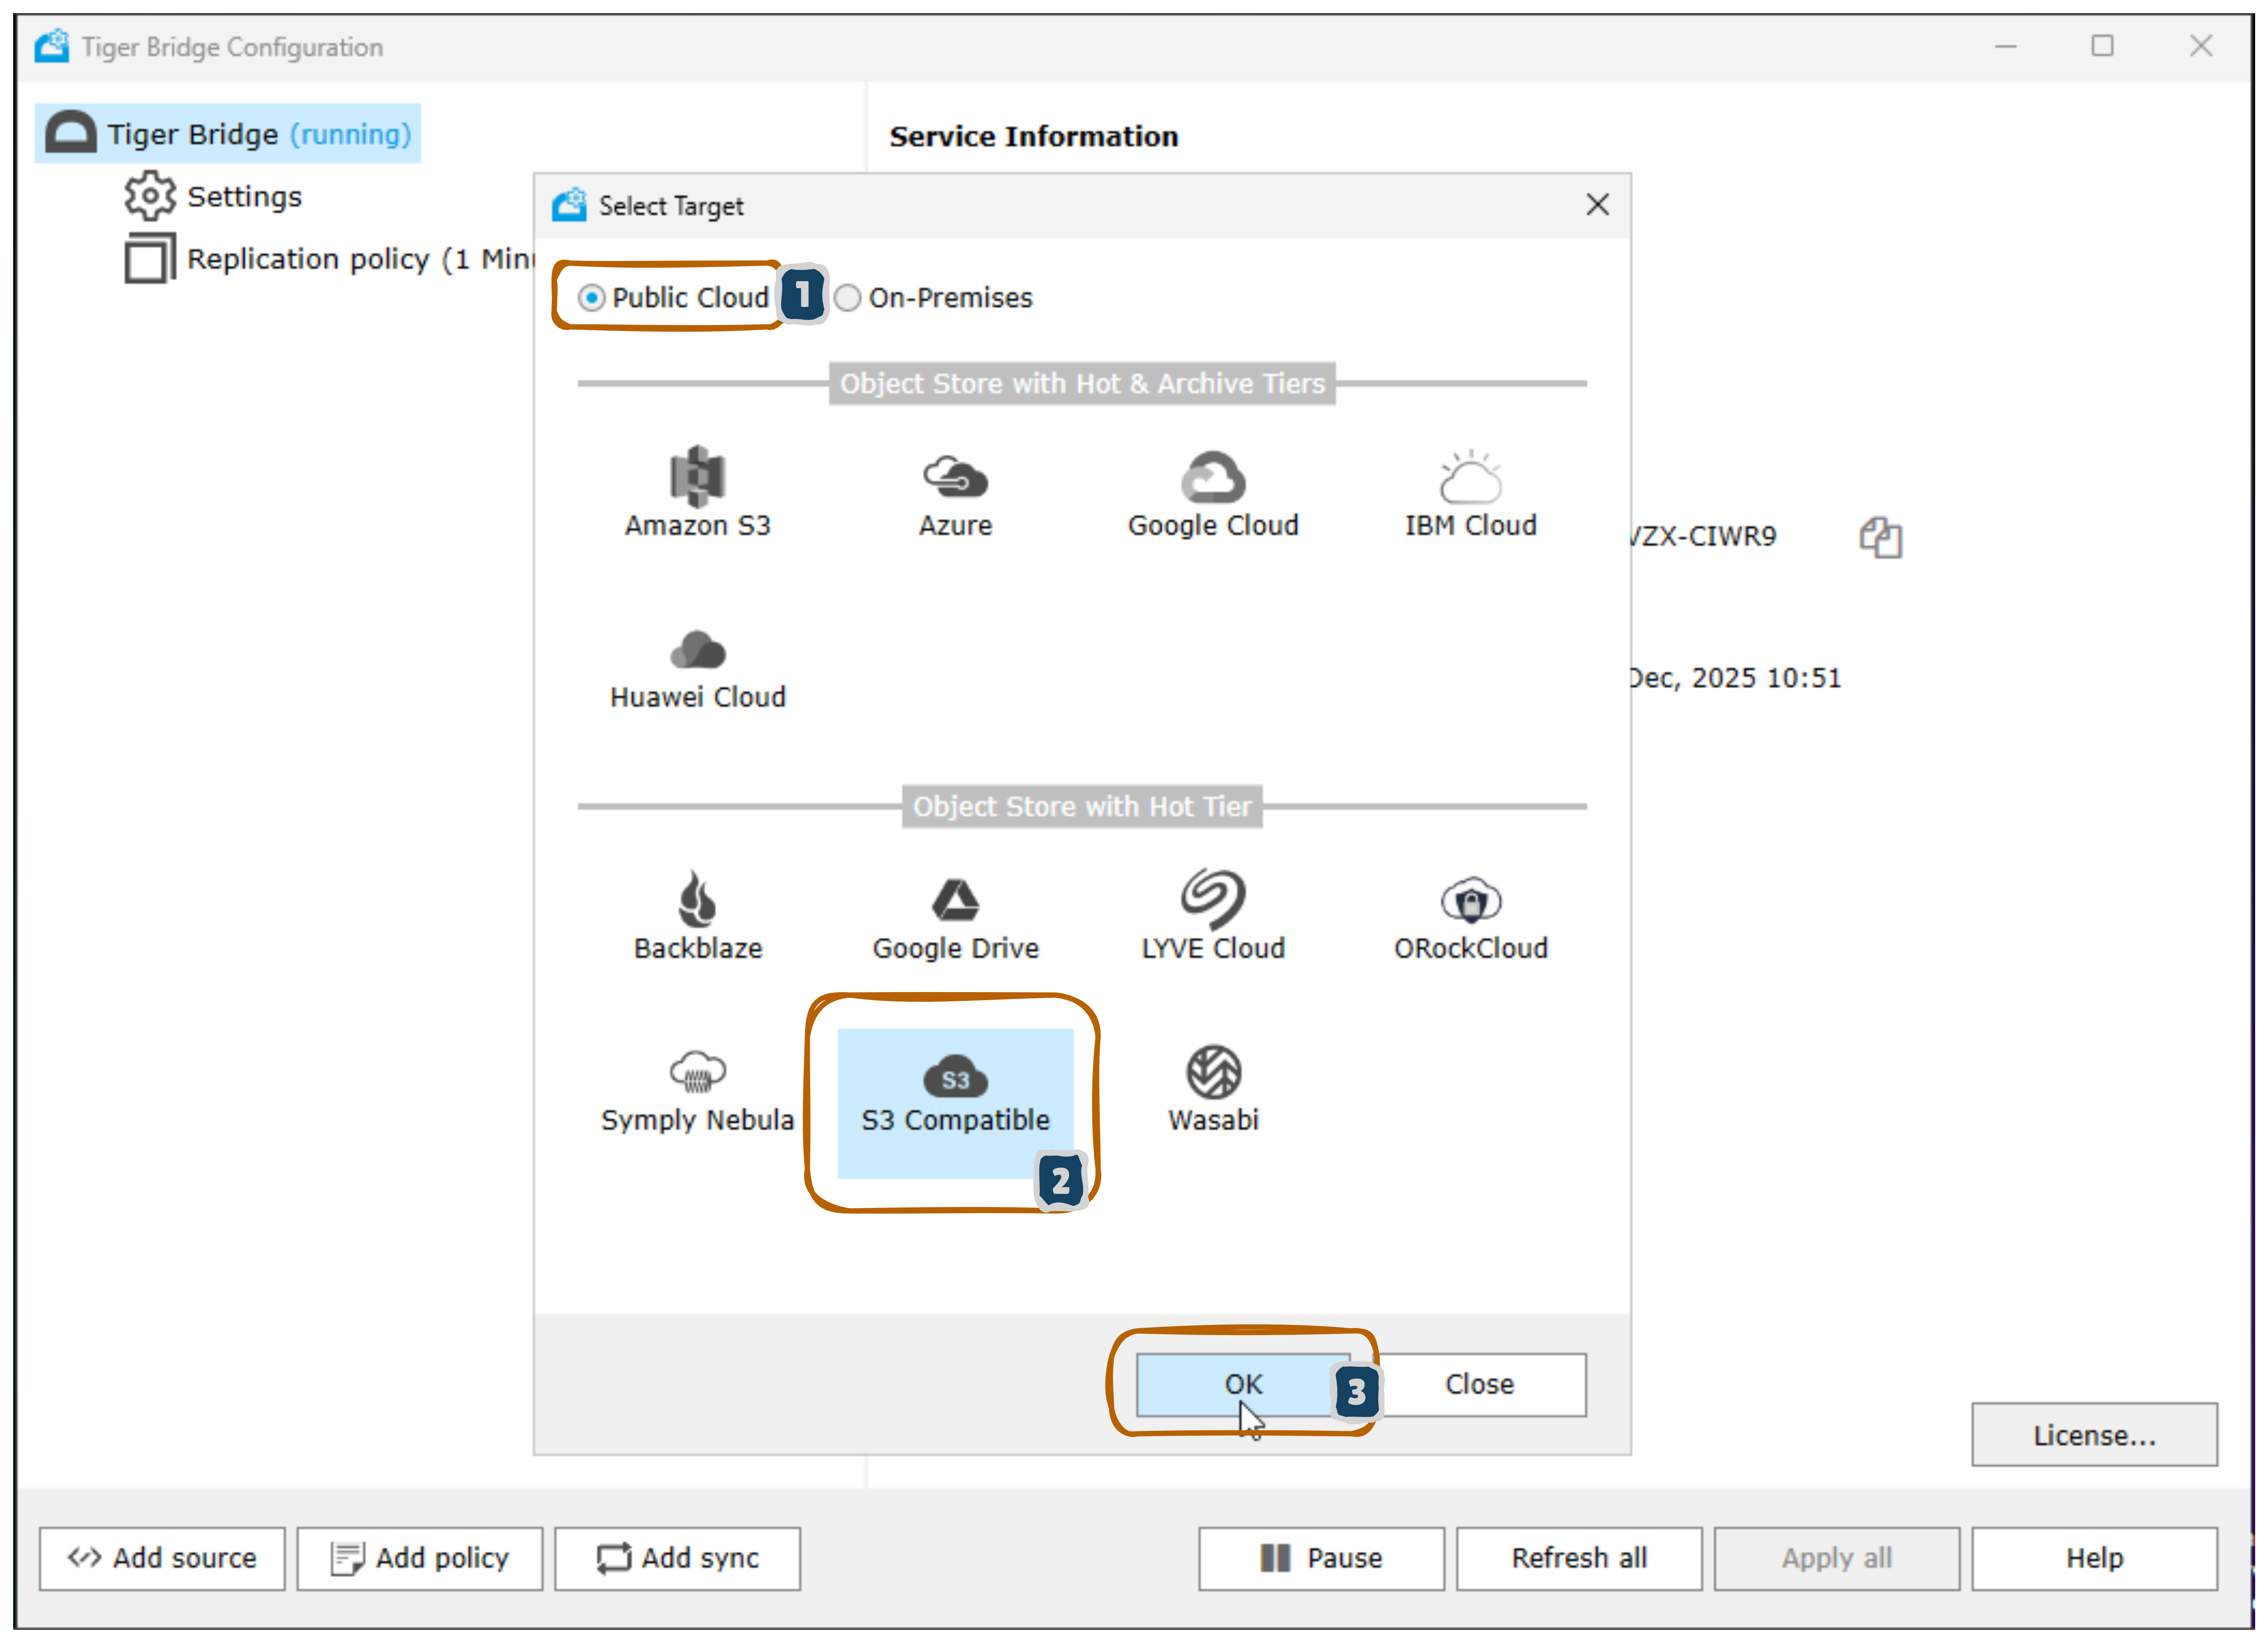
Step 3: Select Cloud Storage Target
- A “Select Target” dialog appears
- Two options are shown:
- Public Cloud (selected - 1)
- On-Premises
- Click the S3 Compatible option (highlighted in blue)
- Click OK (3) to proceed
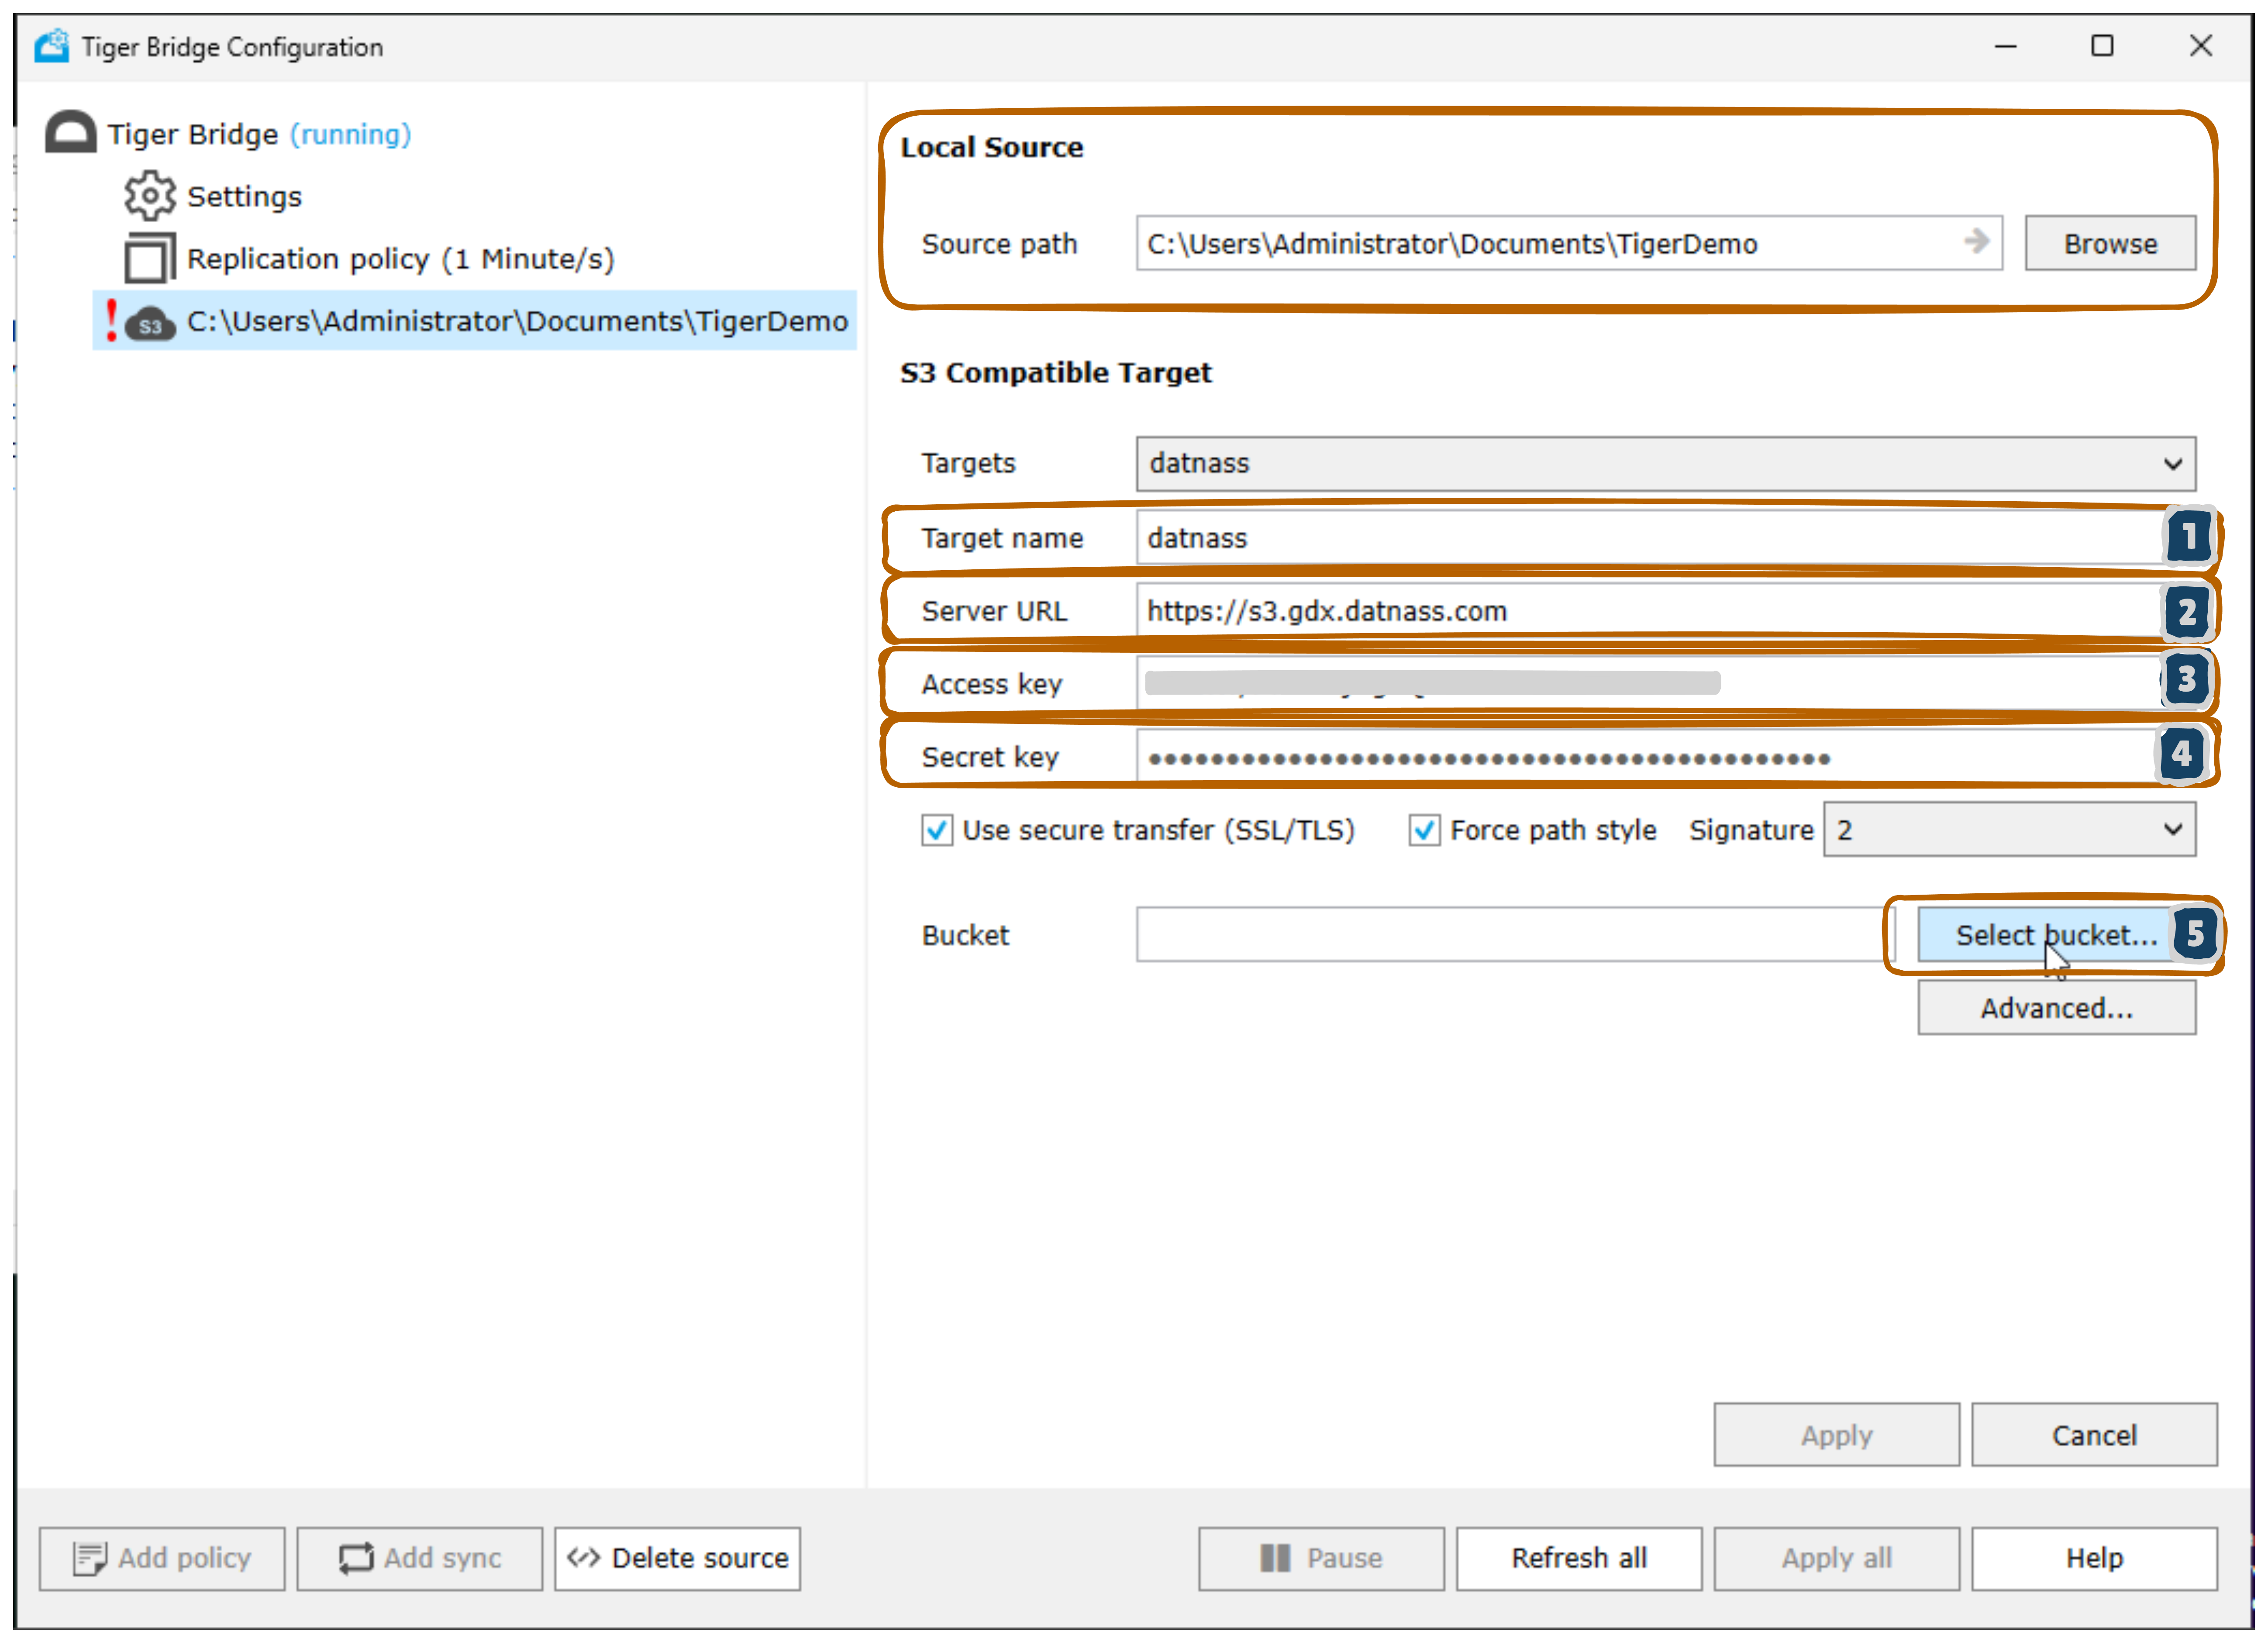
Step 4: Enter GDX Cloud S3 Configuration
The “Local Source” and “S3 Compatible Target” configuration form appears:
Local Source:
- Source path:
C:\Users\Administrator\Documents\TigerDemo - Browse button to change folder
S3 Compatible Target:
- Target name:
datnass(your connection name) - Server URL:
https://s3.gdx.datnass.com(GDX Cloud S3 endpoint) - Access key: Your GDX Cloud Access Key ID
- Secret key: Your GDX Cloud Secret Access Key (shown as dots)
- Use secure transfer (SSL/TLS): ✓ Checked
- Force path style: Checked
- Signature: Version 2 (dropdown)
- Bucket: Click Select bucket… (5) to choose
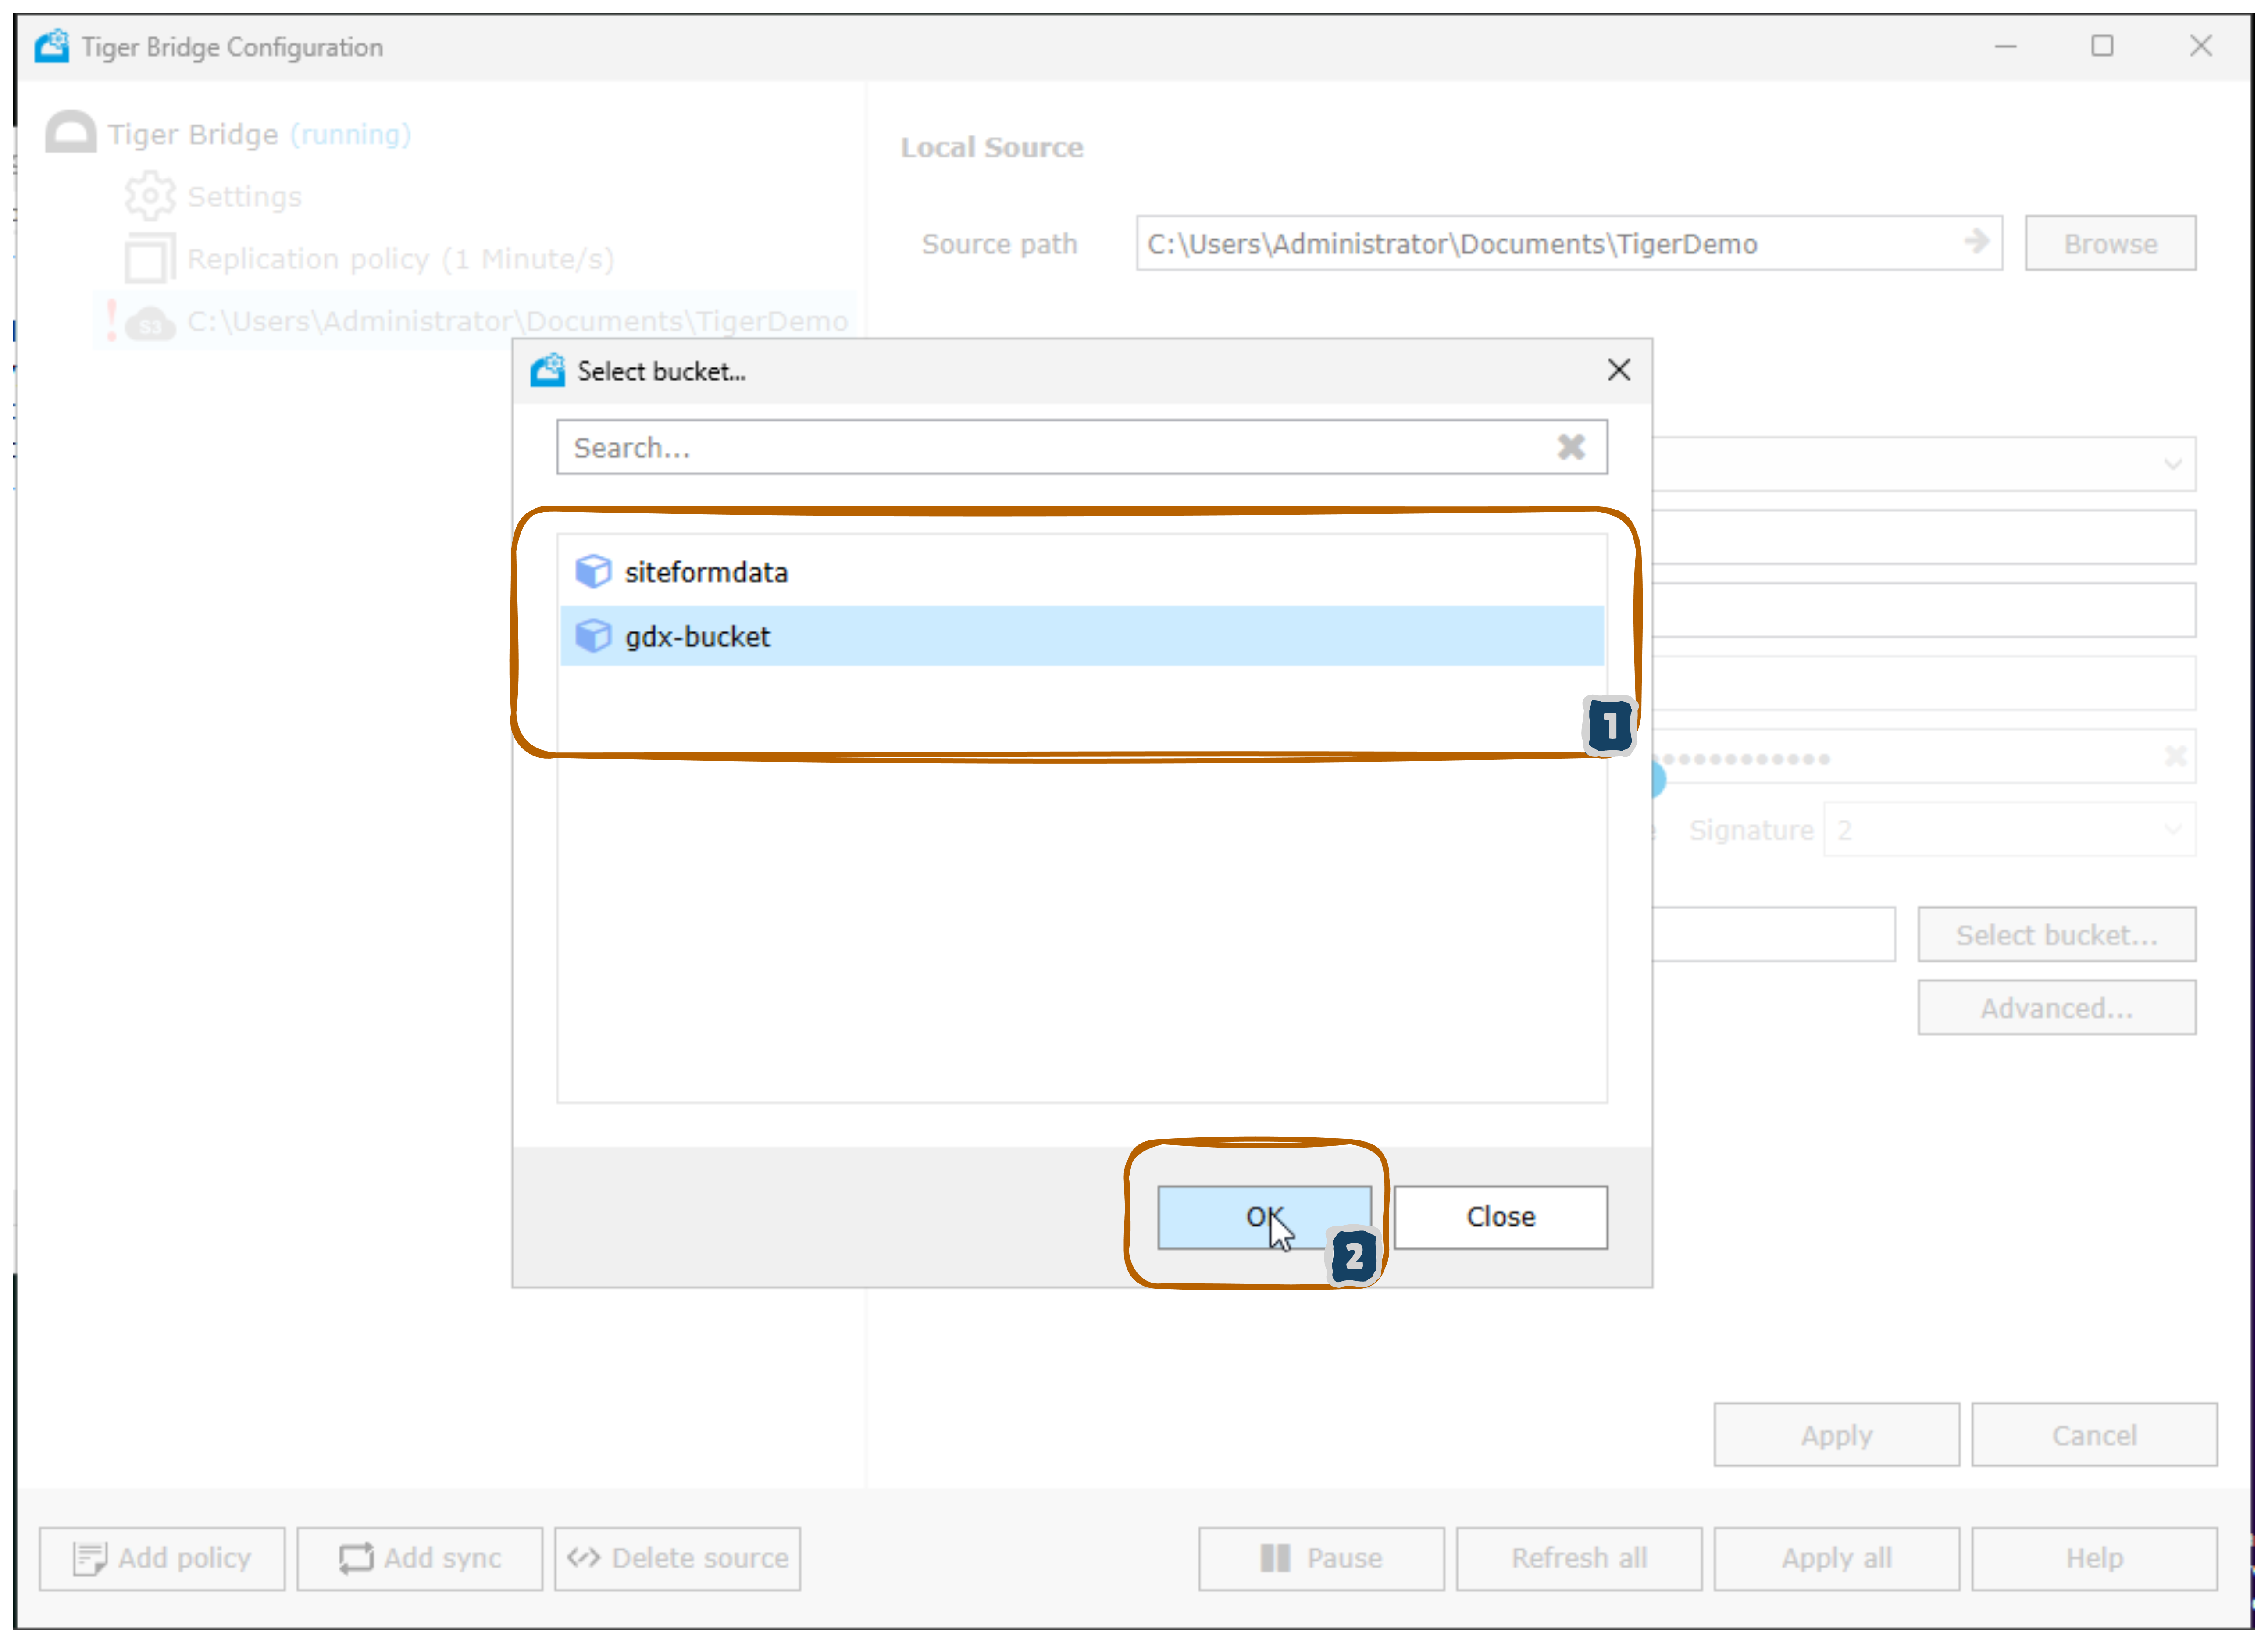
Step 5: Select GDX Cloud Bucket
- A “Select bucket…” dialog opens
- Shows available buckets in your GDX Cloud account
- Use the search box to find specific buckets
- Click OK (2) to confirm your bucket selection
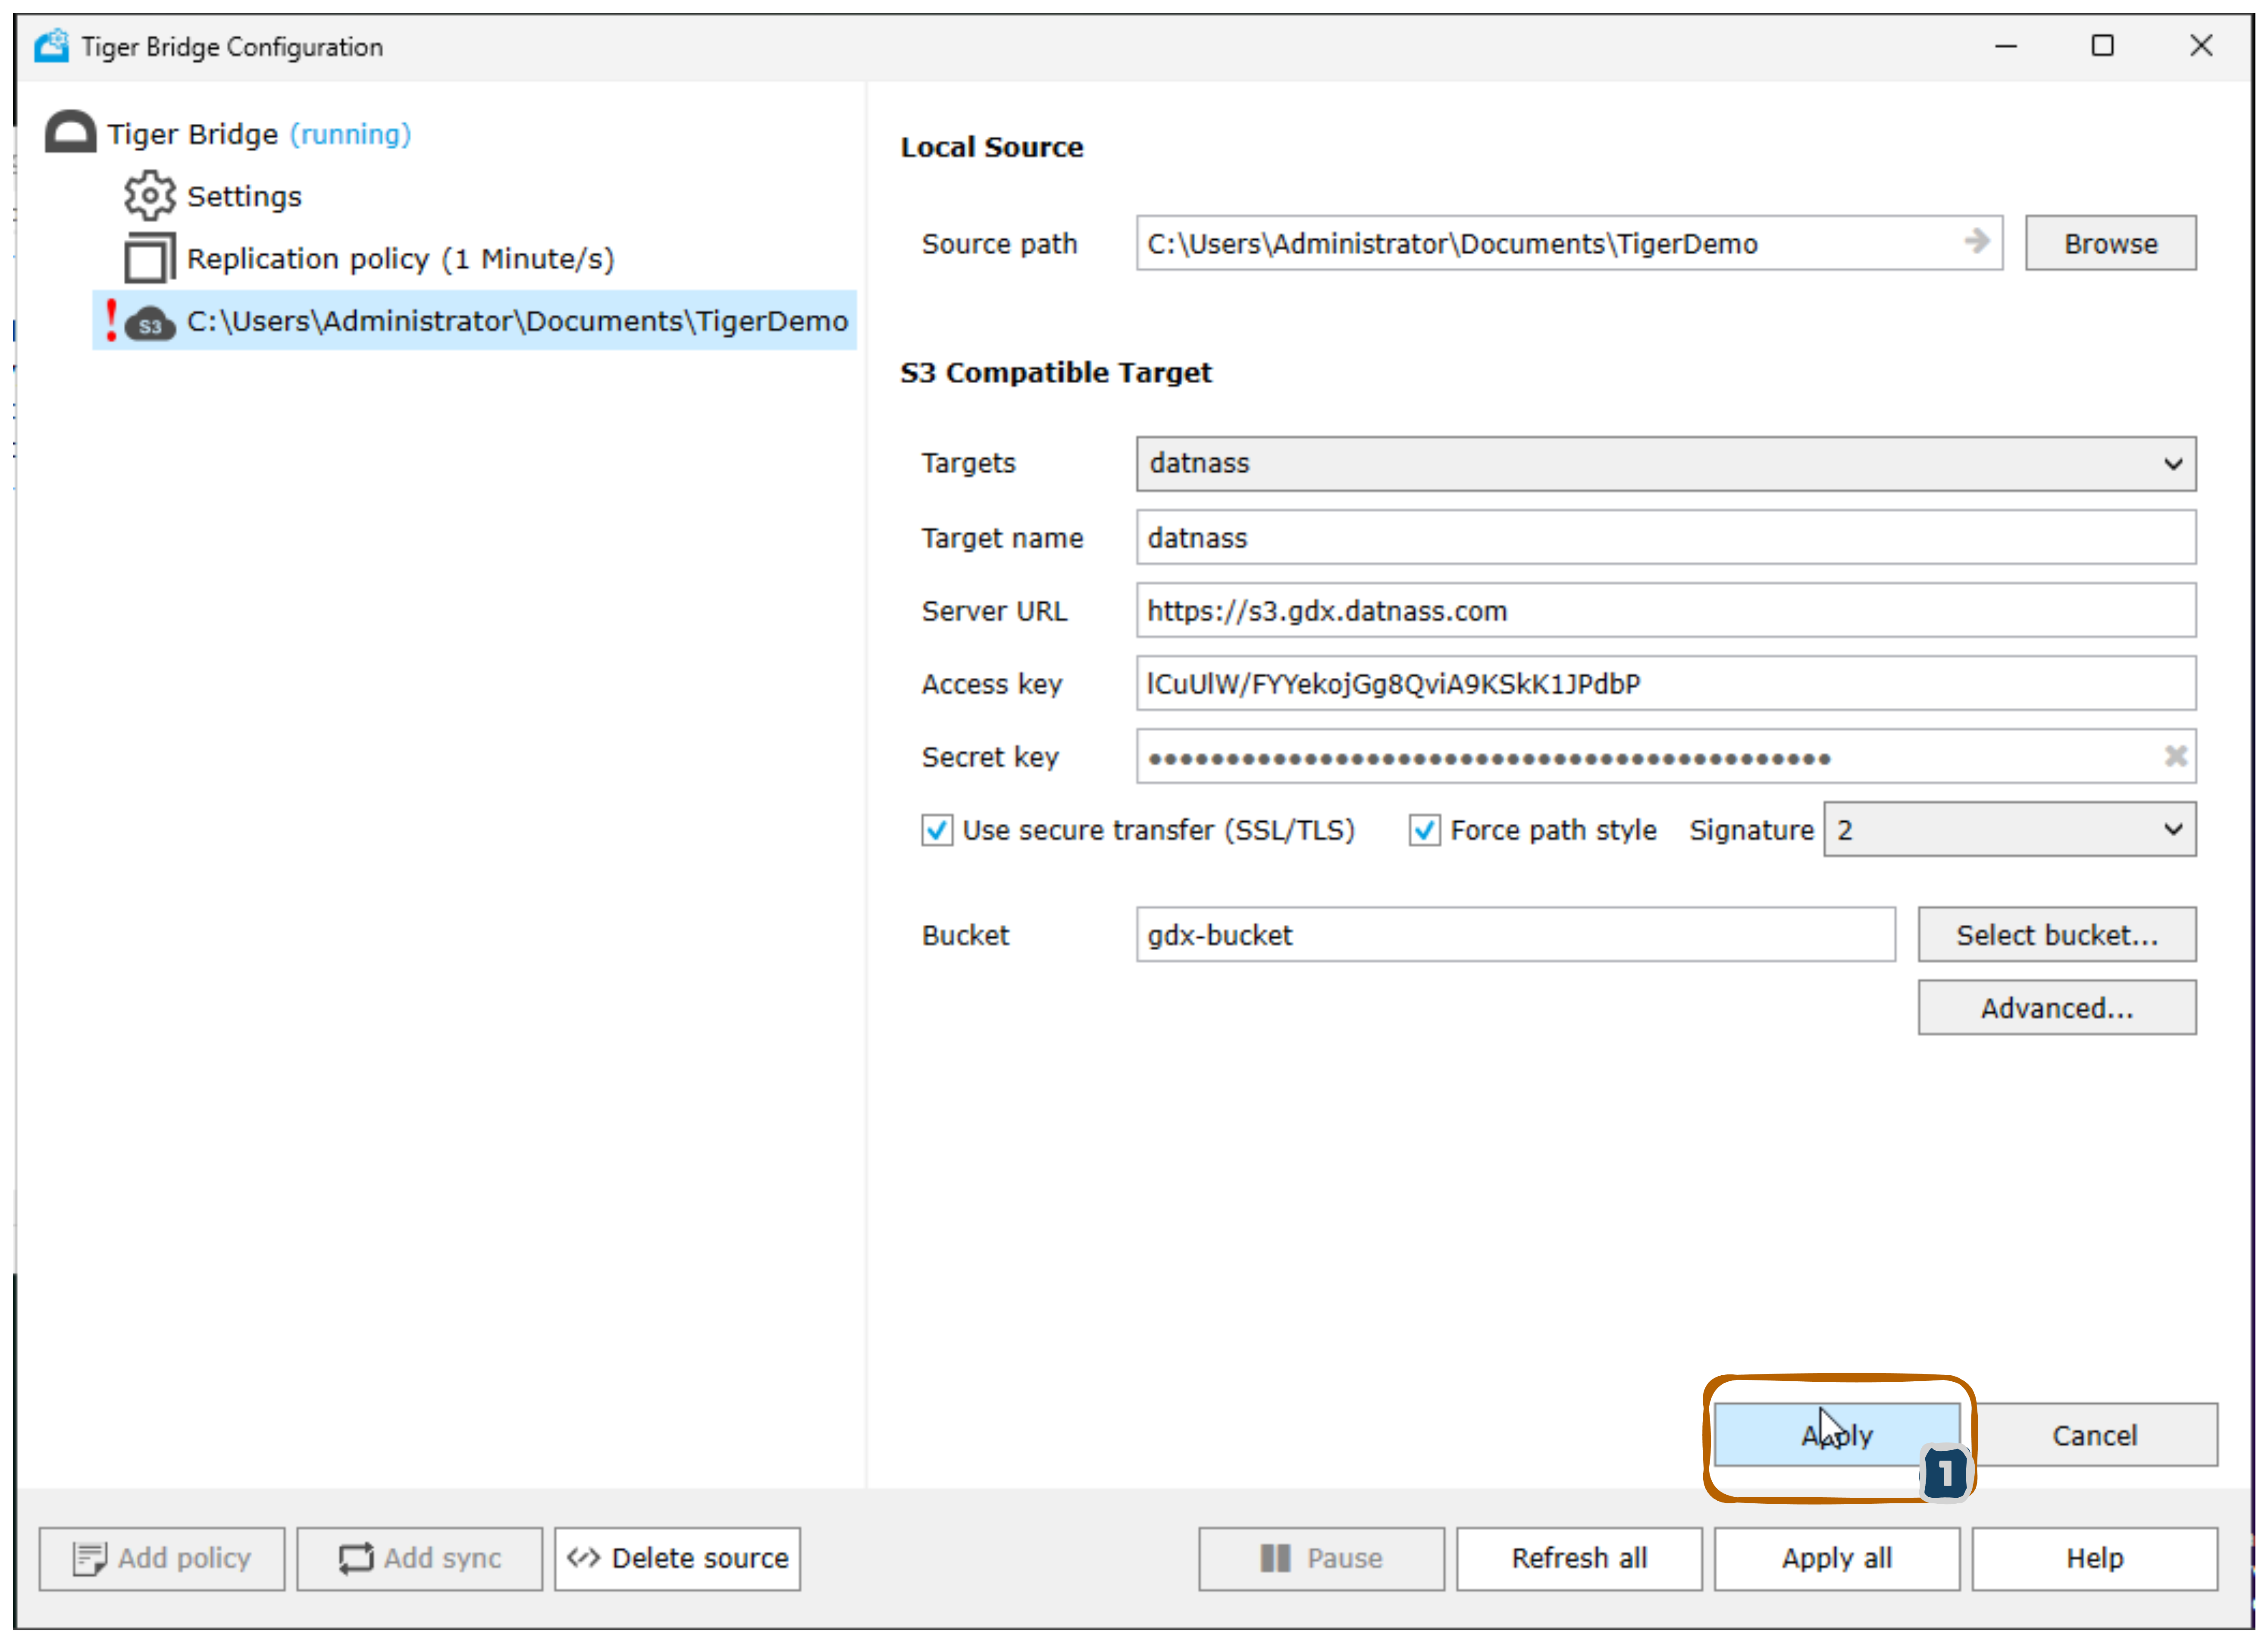
Step 6: Confirm Bucket Selection
- After selecting the bucket, return to the S3 Compatible Target form
- The Bucket field now displays your selected bucket
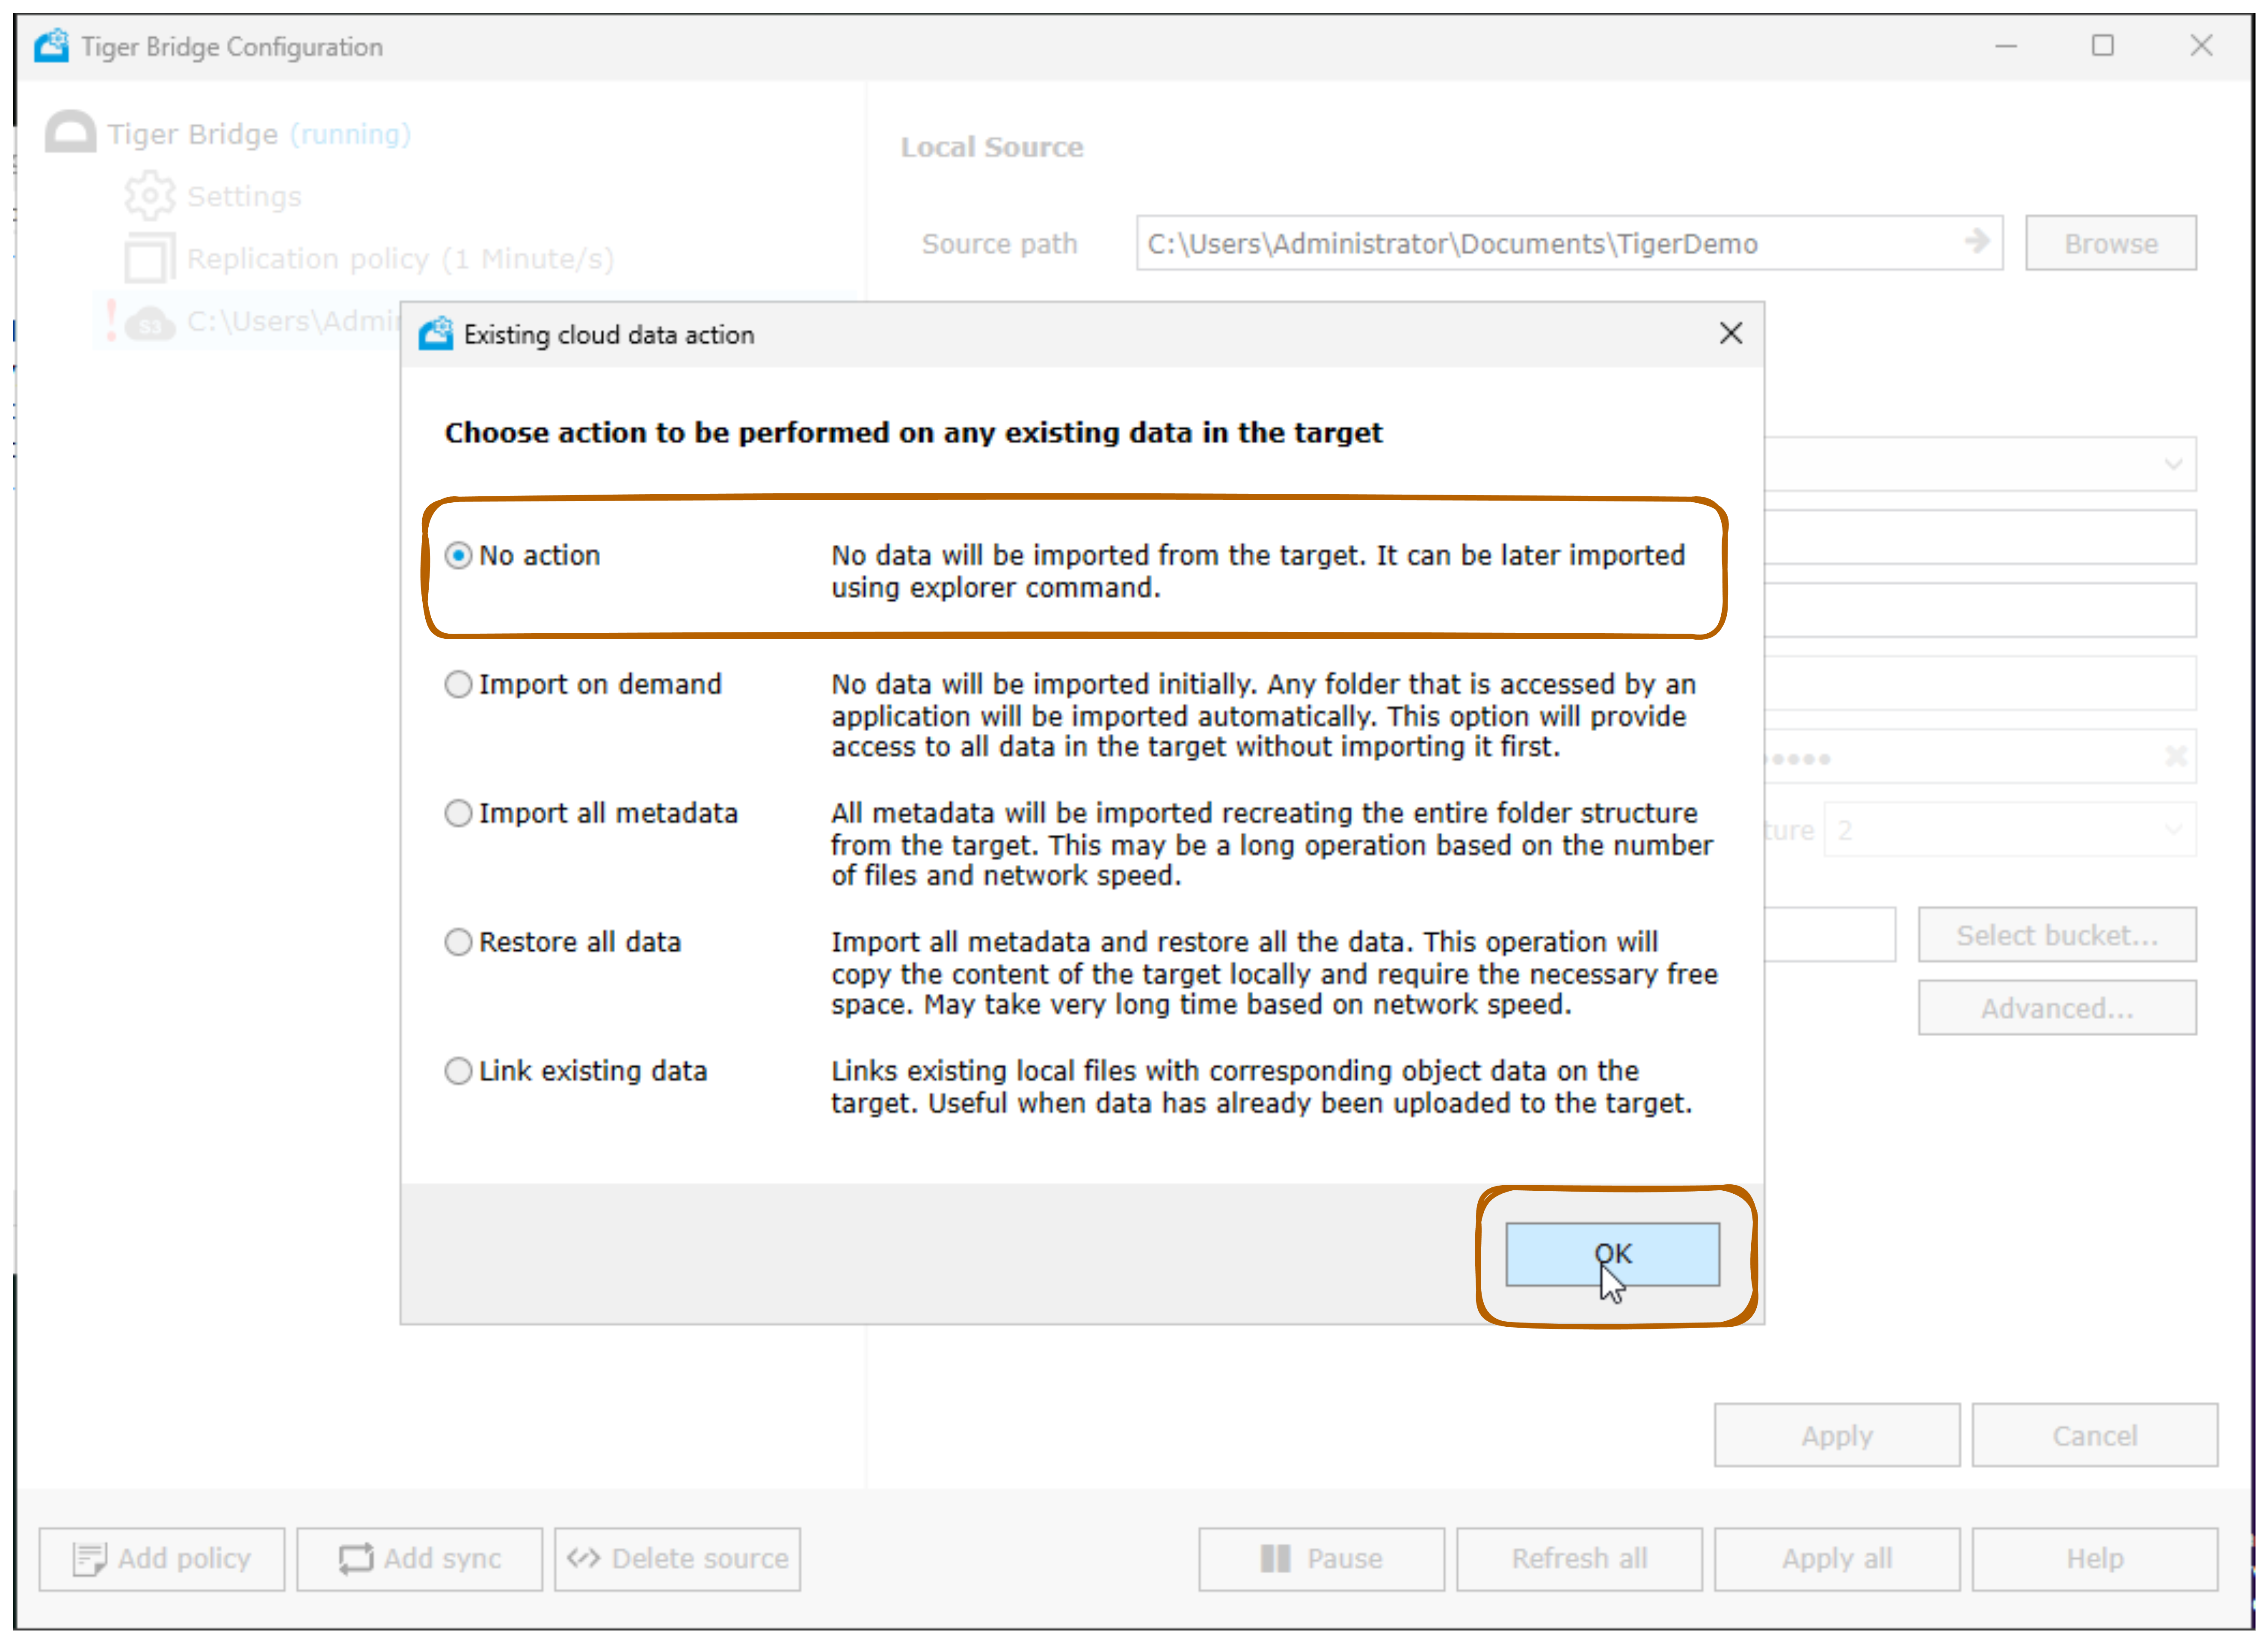
Step 7: Select Data Handling Action
- An “Existing cloud data action” dialog appears
- Choose how to handle existing data in the target:
Option 1 - No action (Recommended for new bucket)
- No data will be imported from the target
- It can be later imported using explorer command
- Select this if bucket is empty or new
Option 2 - Import on demand
- No data imported initially
- Any folder accessed by an application will be imported automatically
- Provides lazy loading of data
- Good for large existing datasets
Option 3 - Import all metadata
- Imports all metadata recreating the entire folder structure
- May take long time based on file count and network speed
- Good for understanding structure
Option 4 - Restore all data
- Imports all metadata and restores all data
- Copies content locally and requires free space
- May take very long time based on network speed
Option 5 - Link existing data
- Links existing local files with corresponding object data on target
- Useful when data already uploaded to target
- Good for existing data matching
- Select No action (recommended for first setup)
- Click OK to confirm
Step 8: Verify Configuration Applied
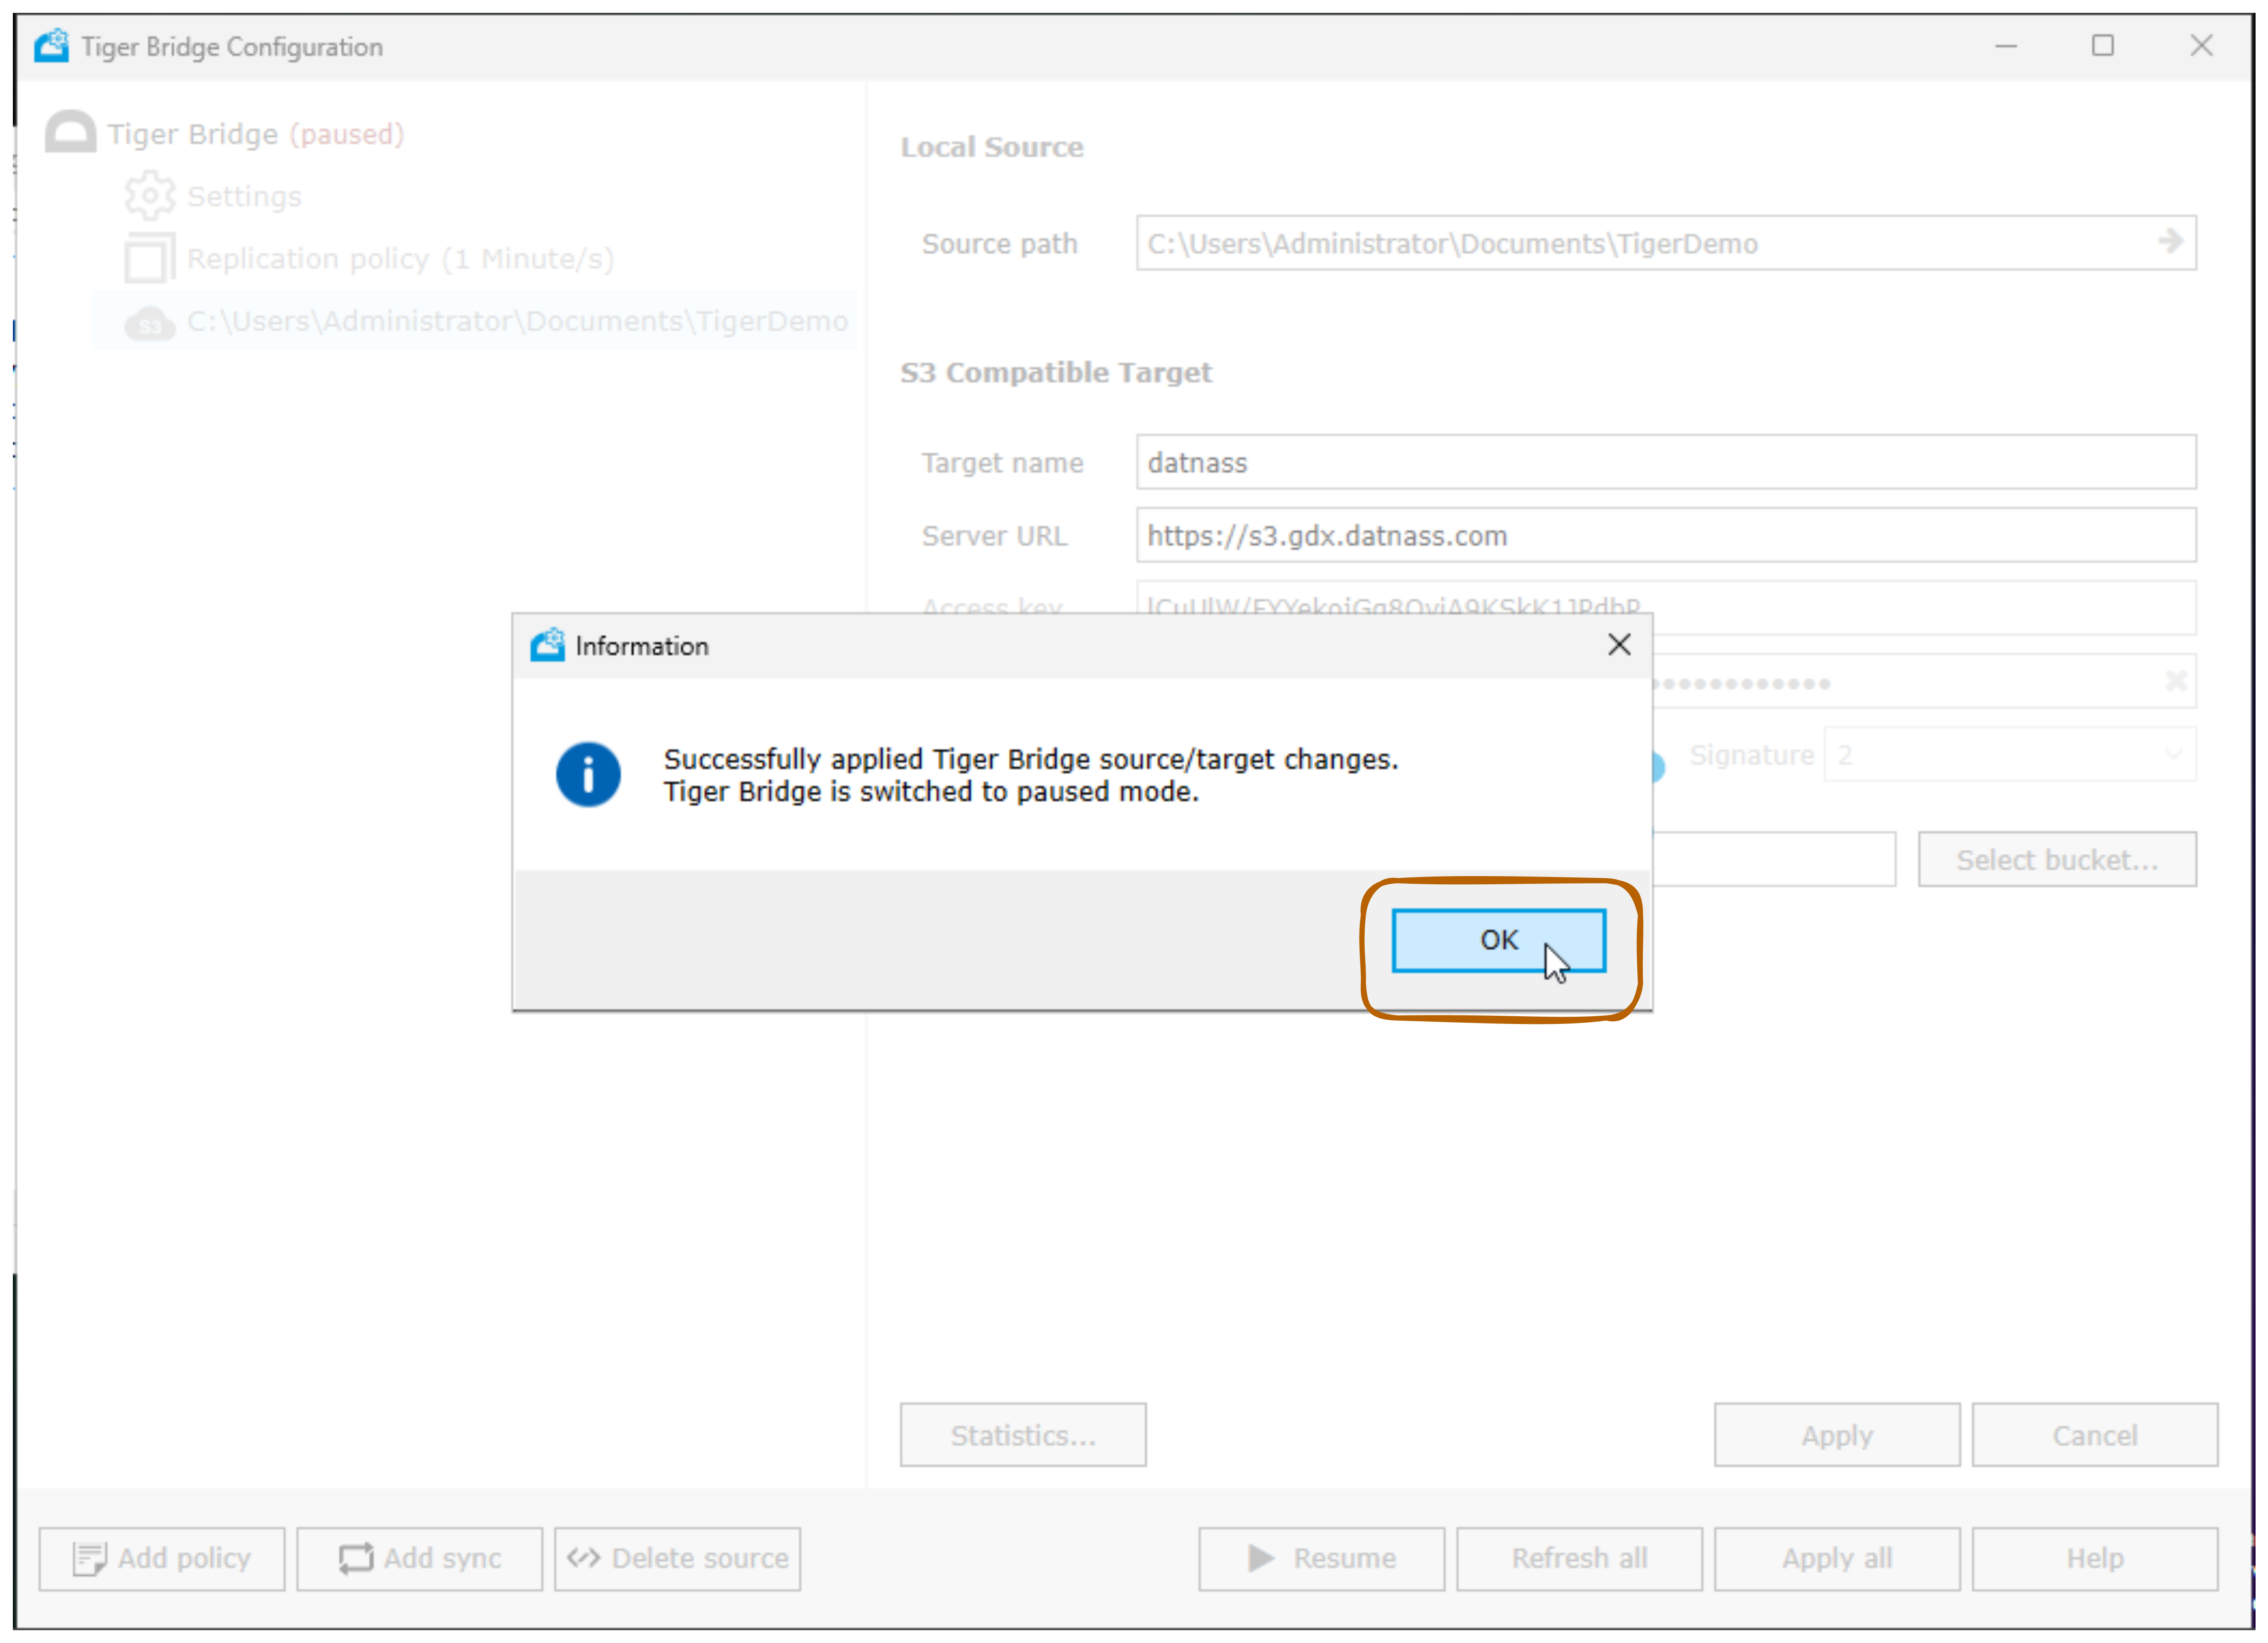
- A success message appears: “Successfully applied Tiger Bridge source/target changes. Tiger Bridge is switched to paused mode.”
- The Tiger Bridge status changes to “Tiger Bridge (paused)”
- This is normal - allows you to verify configuration before starting replication
- Click OK to close the confirmation dialog
Step 9: Review Final Configuration
- The configuration is now complete and paused
- You can see in the left sidebar:
- Source path:
C:\Users\Administrator\Documents\TigerDemo - Status shows paused mode
- Source path:
- The right panel displays:
- Service Information
- License Information (1 TB capacity, used 0 bytes)
- Sync: Enabled
- HSM: Enabled
- All targets available
- The Resume button (2) is now available to start replication
To start the replication:
- Click the Resume button to begin syncing from your source to the GDX Cloud bucket
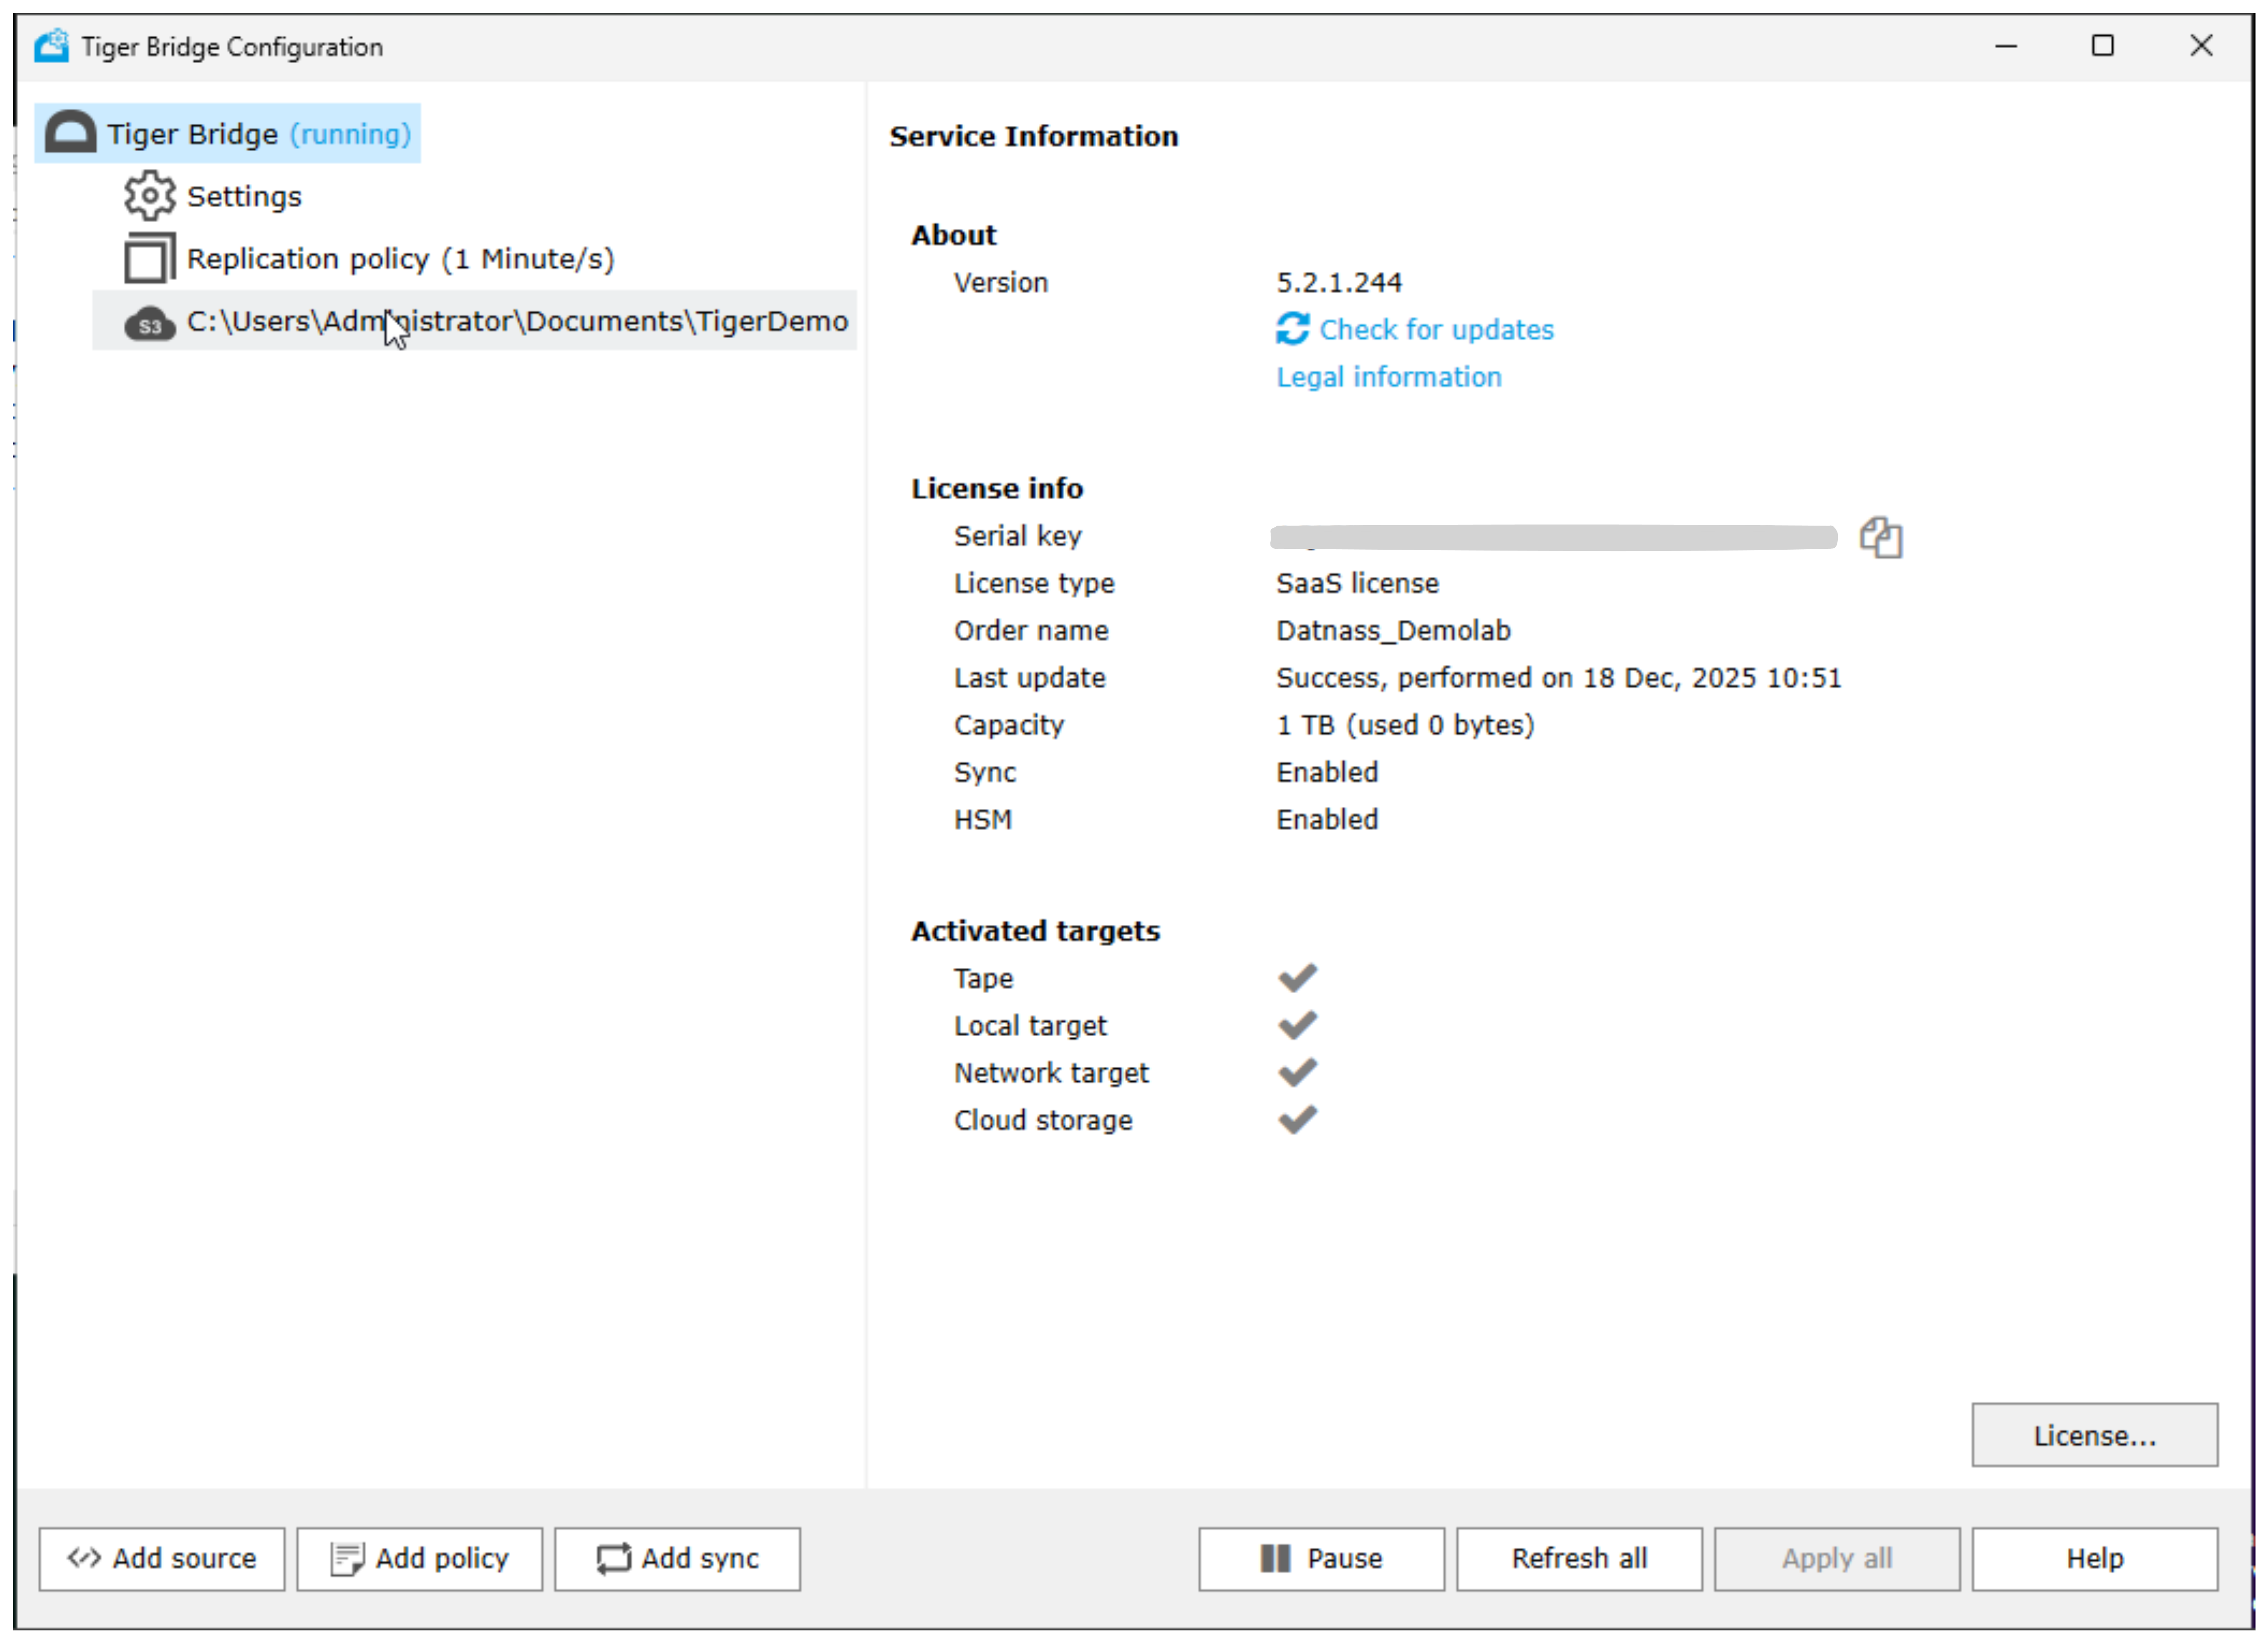
Step 10: Start Replication - Resume Tiger Bridge
- After verifying all settings, click the Resume button
- Tiger Bridge status changes from “paused” to “running”
- Replication begins automatically:
- Files from your source folder start uploading to GDX Cloud
- The replication policy shows a 1 Minute/s sync interval
- The service stays active in the background
The replication is now active and continuously syncing changes.
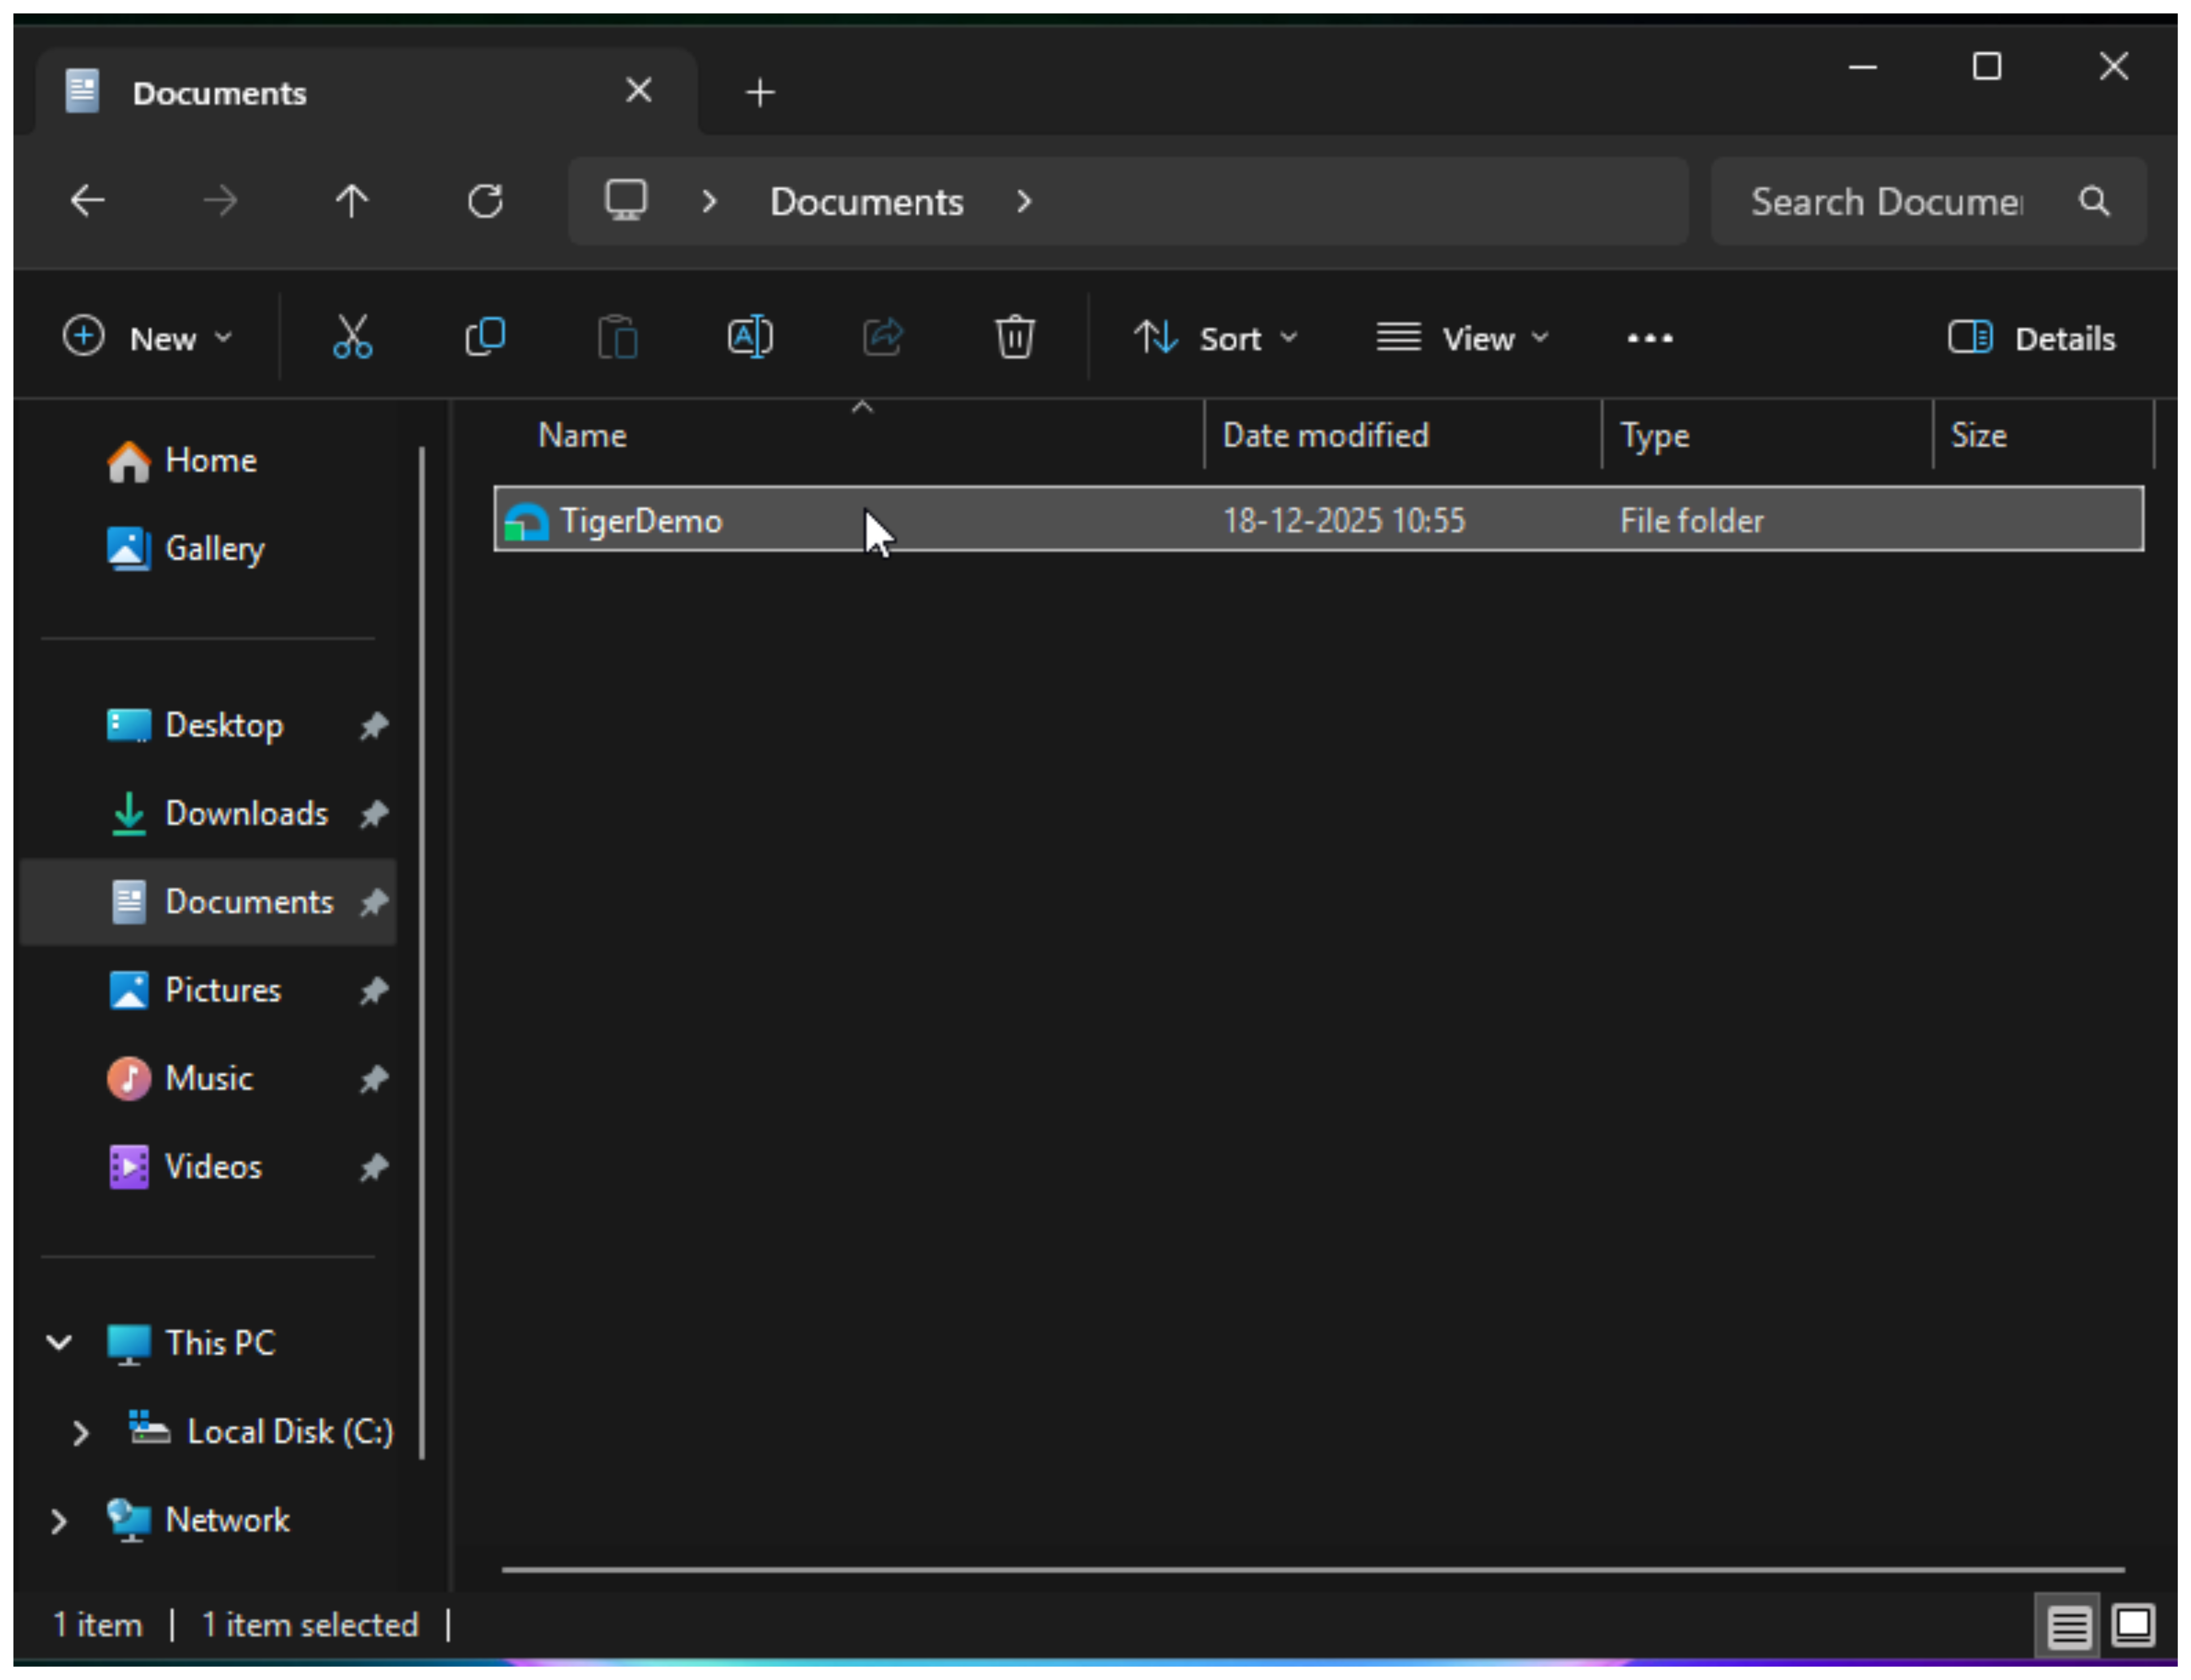
Step 11: Verify Files in GDX Cloud
- To verify files are being backed up, open your local file explorer
- Navigate to the source folder (e.g., Documents/TigerDemo)
- You’ll see the folder appears in cloud storage with:
- TigerDemo folder (File folder type)
- Date modified: 18-12-2025 10:55
- Status shows as synchronized
Files are now replicated to your GDX Cloud bucket in near real-time!
Troubleshooting
Having issues? Try these solutions:
Tiger Bridge won’t start replication?
- Verify the source folder path is correct and accessible
- Check that GDX Cloud credentials are correct
- Ensure your firewall allows HTTPS/port 443 outbound
- Click the Resume button to start after configuration
Connection fails to GDX Cloud?
- Verify the Server URL:
https://s3.gdx.datnass.comis correct - Check that your Access Key ID and Secret Key are correct
- Ensure SSL/TLS is enabled
- Verify the endpoint is accessible from your network
Files not syncing to cloud?
- Check that Tiger Bridge status is “running” (not paused)
- Verify the replication policy interval (default 1 minute/s)
- Check that your source folder has files ready for backup
- Review Service Information for any errors
- Check that your GDX Cloud Console bucket shows new files
Access denied errors?
- Verify your credentials from the GDX Cloud Console
- Ensure your Access Key has S3 permissions
- Check that the bucket exists and is accessible
- Verify your Secret Key is correct (full length key)
Support & Resources
- Tiger Bridge Support: Contact vendor support for application-specific issues
- GDX Cloud Console: https://console.[your-tenant].datnass.com
- Documentation: Refer to Tiger Bridge documentation for advanced configuration
Your data is now being replicated to GDX Cloud using Tiger Bridge. Your backup is secure and ready!